Basketball Offense - Dribble-Drive Motion Offense
By Dr. James Gels, From the Coach’s Clipboard Basketball Playbook"Helping coaches coach better..."
Disclosure: This page contains affiliate links, which means that Coach's Clipboard receives a small commission (at no cost to you) if you make a purchase using these links.
The dribble-drive motion offense is a popular offense seen at the college, pro, and high school levels. The original innovator was Vance Walberg, former head coach at Pepperdine, and assistant coach at UMass and the Sacramento Kings, and now head men's coach at Fresno State. He called it the "AASAA" offense - meaning "attack, attack, skip, attack, attack".

Vance Walberg
- spacing
- creating gaps
- attacking with the dribble-drive.
- kick-out passes for 3-point shots.
This is a guard-oriented 4-out offense that features spreading the floor and dribble-penetration to the rim for lay-ups or kick-out 3-point shots. Coach Walberg uses the term "key or 3" meaning either a layup, or a 3-point shot.
O1 and O5 are like double point guards, and their mentality is to attack with the dribble first, and are outside shooters secondly. O2 and O3 are set deep in the corners and they are shooters first and dribble-attackers secondly.
The post player does not look to post-up, but rather plays on the opposite block, elbow or short corner, as this creates better spacing and open lanes for dribble-penetration. The post player looks for lobs, or dump passes from penetrating perimeter players, and looks to "clean up" inside with offensive rebounding.
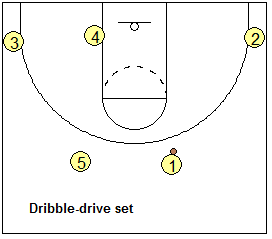
Spacing and Creating Gaps
Let's discuss these together as they are related. To drive to the hoop, we must have good spacing and gaps to penetrate. Important rules for spacing for perimeter players are to rotate to their correct positions as the ball moves (discussed below), and to keep outside the 3-point arc.If a perimeter player dribble-penetrates and then passes back outside, he/she must clear out and get back to the 3-point arc. The same is true if he/she should cut inside - get back out to the arc if you don't get the pass.
The post player O4 must be constantly moving as the ball moves, always on the weakside, so that he/she is not in the way of the dribble-penetrator. At other times, O4 will "T-up" (slide up into the middle of the lane), as on baseline dribble-penetration (discussed below).
Look at the diagrams below. "Single gaps" are difficult to dribble-penetrate because help defenders are in good position. With O2 and O3 deep in the corners, we have "double gaps", which are easier to attack. Further below, we will even discuss how to create a "triple gap".
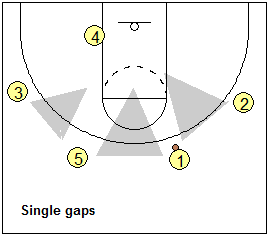
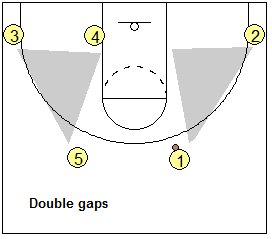
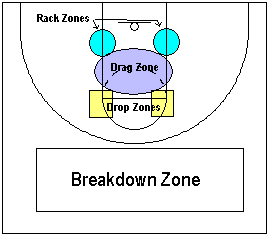
Definitions, Zones
First, we need to define some important terms, the various "zones".- Break-down Zone - where perimeter players will try to break-down the defender 1-on-1.
- Rack Zones - where the attacker finishes with the layup.
- Drop Zones - certain options if the dribble-penetrator stops here.
- Drag Zone - certain options if the dribble-penetrator is stopped here, without shooting.
Attack with the Dribble
You need four perimeter players who can handle the ball and attack the seams 1-on-1 with dribble-penetration and then finish - and four players who can catch-and-shoot the 3-point shot.On dribble-penetration, the ball-handler has several options including: (1) finishing the lay-up, (2) dumping a pass to the post player on the opposite block, (3) passing to a back-cutter inside, or (4) passing it out to the 3-point arc for the outside shot. The main thought process however, should always be "get to the rack" - the other options are there if the ball is stopped.
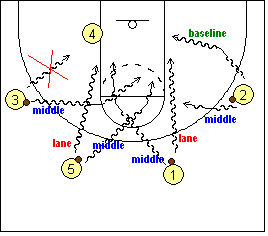
The diagram above shows the dribble lane options for each perimeter spot. O1 and O5 have two dribble-lane options - lane penetration (up the lane line) and middle penetration. O2 has two dribble options - middle and baseline. O3 has one dribble option - just middle penetration. We don't want O3 to dribble baseline, as the options are not as good here with O4 often on that side.
We'll discuss these dribble-options in more detail.
O1 Dribble-Penetration
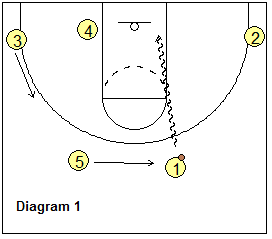
O1 has two dribble-penetration options... (1) up the lane and (2) to the middle.O1 lane-penetration
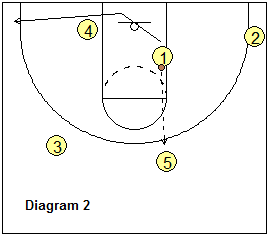
Diagram 1 shows O1's lane-penetration. His/her thought is "get to the rack" and score. O5 slides behind O1, and might get the return pass from O1 (diagram 2) if O1 stops in the "drag zone". Here O1 reverse pivots and passes back to O5.Notice that O3 rotates up to the high wing area to find the "open window" here, open for a pass from the dribbler. O4 stays on the weakside and looks to rebound and clean-up a miss. O1 could also pass to O4 if the X4 defender moves over to stop O1. Once O1 passes, he/she clears out quickly to the opposite corner.
O1 middle-penetration
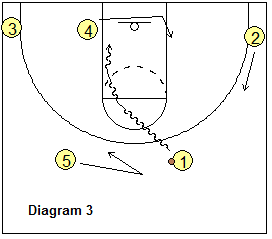
Diagram 3 shows O1 middle-penetration. Often the X1 defender overplays (right) and denies lane penetration. O1 makes the cross-over and dribble-penetrates the middle. O4 re-locates to the right side of the lane. O5 initially moves right (to accept a possible kick-back from O1), and then moves back to the lane line once O1 attacks. O2 rotates up and O3 stays deep in the corner.O5 Dribble-Penetration
O5 has two dribble-penetration options - (1) up the lane and (2) to the middle.O5 lane-penetration
Diagram 4 shows O5 lane-penetration. His/her thought is "get to the rack" and score. O1 slides behind O5, and might get the return pass from O5. O4 re-locates to the right block. O2 slides up to the high wing spot. It's very important for O2 to find and move to the "open window" for an open pass from the dribbler.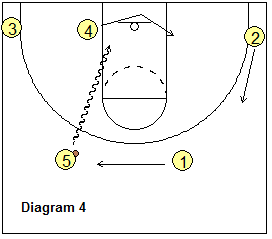
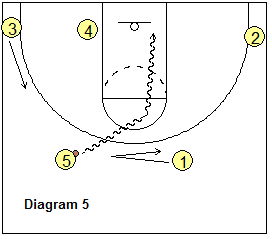
O5 middle-penetration
Diagram 5 shows O5 middle-penetration. O1 initially moves left (to accept a possible kick-back from O5), and then moves back to the lane line once O5 attacks. O3 rotates up and O2 stays deep in the corner.O2 Dribble-Penetration - from Transition
O2 has two dribble-penetration options: (1) middle and (2) baseline. Diagram 6 below shows transition. Notice that O2 and O3 are high on the wing when the ball is still in the back-court, as we always want O1 (and O5) to pass quickly up the court to either O2 or O3. If the ball is not passed up the floor, once it crosses half-court O2 and O3 move down to the corners.O2 middle-penetration off transition
In diagram 6, O2 gets the pass and immediately attacks the middle. O4 re-locates to the right block. O1 fills in the spot vacated by O2. If O2 gets stopped inside, he/she could reverse pivot and pass back to O1 or O5. O5 fills in his/her usual top left spot.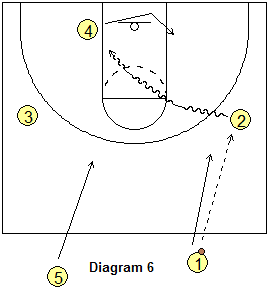
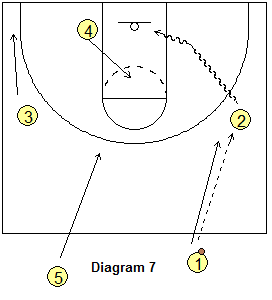
O2 baseline-penetration off transition
In diagram 7, O4 "T's-up" - i.e. slides up into the middle of the paint for a possible dump or lob pass from O2. O3 goes to the corner for a possible pass from O2. If O2 gets stopped inside, he/she could reverse pivot and pass back to O1. O1 fills O2's spot and O5 goes to his/her usual spot on top.O3 Dribble-Penetration - from Transition
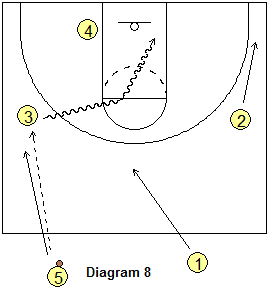
O3 has only one dribble-penetration option - to the middle. We don't want O3 to dribble baseline, as the options usually are not good here.O3 middle-penetration
In diagram 8 above, O3 gets the pass and attacks the middle. O2 slides to the corner for a possible pass from O3. O5 fills O3's spot and O1 goes to his/her usual spot on top.The diagram also points out another important rule: anytime a wing player has the ball, the opposite wing should be on a diagonal - so here O2 goes to the corner diagonally opposite from O3 on the wing.
See the complete article in the members section.
SIGN UP NOW FOR MEMBERSHIP! The complete article also includes:
- Drop Zone Options - "Drop 2", "Drop 2, 1-4 Give and Go", "Drop 2, O4 Clear-Out", "Drop 3", "Drop 3, 1-4 Give and Go", "Drop 3, O4 Clear-Out"
- Kick-Backs - "positive" and "negative"
- Kick-Ups - to O2 and O3
- "415" play - creating a "triple-gap"
- Drag Zone Options - "Drag-5" and "Drag-3"
- Additional Rules and Examples - pass and cut, dribble-at back-cut, pass fake and back-cut, wing to point pass - slide to corner
- Getting the ball inside to O4 posting up
- More Transition Options
- Point Guard Options
- And a detailed Animation!
Players must keep moving, maintain their spacing, create double and triple gaps, and think "attack" at all times. To counteract this offense, defenses may use the "pack-line" defense, or a zone defense to clog things up inside. So you need to practice your zone offense as well.
You may have noticed that there is no screening in this offense. This avoids moving screens and having to spend time teaching players how to screen correctly. But you can add some screening with simple pick-and-roll and pick-and-pop plays.
Also see:
- Dribble-Drive Motion Offense Drills
- The Dribble-Drive Motion Offense - Running the Offense
- Dribble-Drive Set Plays
- Dribble-Drive Zone Offense