Basketball Defense - 1-2-2 and 3-2 Half-Court Zone Defenses
By Dr. James Gels, From the Coach’s Clipboard Basketball Playbook"Helping coaches coach better..."
Disclosure: This page contains affiliate links, which means that Coach's Clipboard receives a small commission (at no cost to you) if you make a purchase using these links.

1-2-2 Zone Defense
Strengths
The 1-2-2 zone has the advantages of being able to pressure the ball on the outside arc, allow for some trapping, and can be effective against a good outside shooting team (whereas the 2-3 zone is more effective against inside scoring and dribble penetration).Weaknesses
The weaknesses are the (1) high post area, and (2) this defense can be attacked from the corners. The diagrams show how the zone shifts. Also see the animation.Ball on the wing.
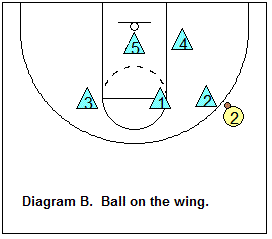
See Diagram B. The wing defender covers this and X1 drops down to the ball-side free-throw line area. Anticipating that the next pass may go to the corner, X5 slides over to mid-lane. If the pass goes to the corner, X4 can sprint out and X5 rotate more easily to the ballside low block.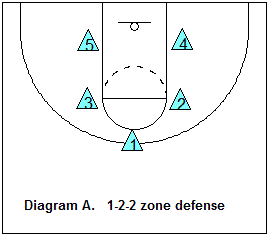
Trapping the wing.
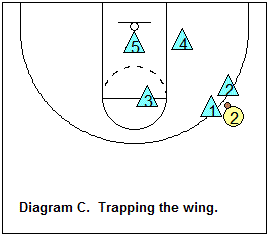
See Diagram C. If you want to gamble and trap the wing, use X1 and the ball-side wing to make the trap. The opposite wing slides to the high post. Although trapping the wing adds an element of risk to your defense, consider this when the opponent's ball-handling skills are not good, or if you are behind and need to pressure the ball.Opponents will attack this zone from the corner. Your defenders must shift quickly to prevent the pass from the corner to the low post.
Ball in the corner, no trap, deny the corner to wing pass.
See Diagram D. X4 will come out on the ball, and X5 rotates quickly to defend the ball-side low post. The weak-side wing (X3) will drop down to the weak-side low block and cover the backside. X2 will deny the pass back out.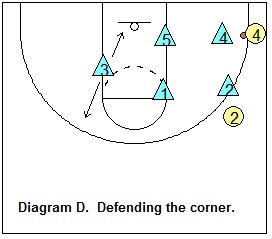
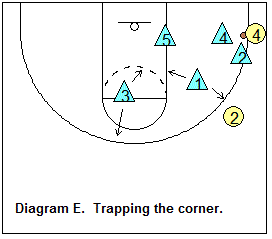
Trapping the corner
See Diagram E. You can try trapping the corner if X2 can get down there quickly. Once again, X4 will come out on the ball, and the ball-side wing (X2) will sprint down and trap. X5 must move quickly and "get there" to defend the ball-side low post. X1 fills the gap between the ball-side elbow and the three-point arc. The weak-side wing (X3) will move just inside the free-throw line and cover the high post and backside.Defending the high post
This can be a problem with this zone. We'll discuss some strategies for stopping this.1. When the ball is on the wing, and you are not trapping the wing (diagram F), X1 should slide down and deny the pass to the high post.
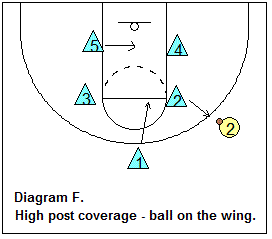
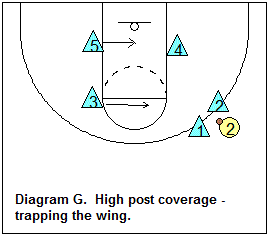
2. When the ball is on the wing, and you are trapping the wing (diagram G), then the opposite wing must defend the high post.
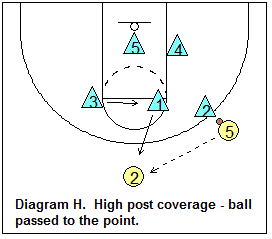
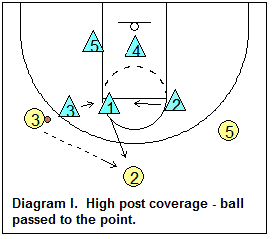
3. When the ball is passed to the point, the opposite wing must defend the high post (if there is a high post player there). See Diagrams H and I.
4. If you are still having difficulty defending the high post, and if the opponent's point guard is not a good shooter, then consider going to the 3-2 zone.
3-2 Zone Defense
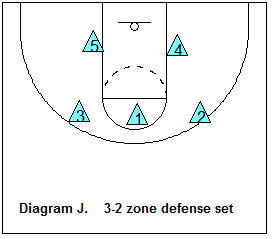
With the 3-2 zone, you drop the point defender (X1) down on the free throw line. Because of this, you can also position your wing defenders out a little wider.
This will help defending the high post, but allows the point guard some open shots.
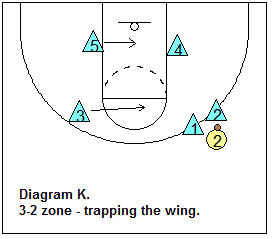
With the 3-2 zone, you can still cover the wing the same as in the 1-2-2 zone seen in diagram B. You can trap the wing with the wing defender and the middle defender, while the opposite wing slides into the high post (Diagram K). The weakside low defender X5 moves to the middle of the lane when the ball in on the wing.
Cover the corner by having the ball-side low defender (X4) come out and the weak-side low defender (X5) rotate to the ball-side low block, exactly the same as with the 1-2-2 zone (Diagrams D and E above). The weak-side wing (X3) moves to the ball-side elbow.
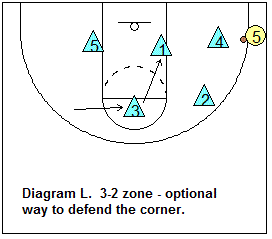
Optionally, instead of X5 sliding over to cover the ball-side low block, you could cover the ball-side low post with X1 sliding down (see Diagram L), but this could cause a size mis-match. Personally, I would defend this using the same rotations as used in the 1-2-2 zone above.
Related pages:
- Principles of Zone Defense
- Zone Rebounding
- 2-3 Zone Defense
- Aggressive 2-3 Zone Defense
- Breakdown Drills for Teaching the 2-3 Zone Defense
- 1-3-1 zone defense
- Amoeba Defense
- Point-Zone Defense
- Match-up zone defense