Basketball Defense - 2-3 Zone Defense
By Dr. James Gels, from the Coach’s Clipboard Basketball PlaybookDisclosure: This page contains affiliate links, which means that Coach's Clipboard receives a small commission (at no cost to you) if you make a purchase using these links.

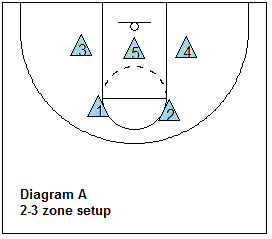
The 2-3 zone defense is the most commonly used zone defense. It has the advantage of protecting the inside, lane area, and keeps your "bigs" inside. Its weakness is it is vulnerable to good outside shooting, with open areas on the wings, point and high post. Read "Zone Defense" for more about playing zone defense, and Zone Rebounding for tips on rebounding out of the zone.
Sometimes we think of the 2-3 zone as a defense that less-athletic teams can use as it helps to shut down dribble-penetration and the inside post game. It usually requires the offense to be more patient in getting a good shot, and thus it helps you to control tempo.
On the other hand, if you have good, quick athletes, the 2-3 zone can be a more aggressive, trapping style of defense, creating turnovers and steals. You can aggressively trap the corners, wings, and occasionally the point guard. Below are situations, with and without trapping. Study the diagrams below to understand how the zone shifts as the ball moves.

Syracuse coach Jim Boeheim
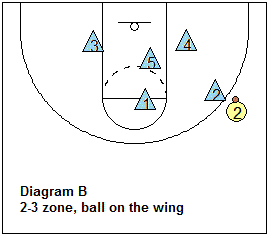
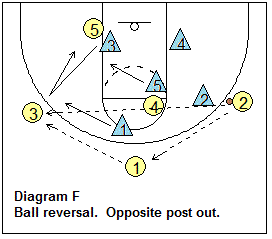
See Diagram B. The outside (top) defender on the ball-side will cover the wing. The exception is on the skip pass from wing to the opposite wing, where the low outside defender will initially run out and defend until the top defender can get there. Then the low defender will drop back down low. This is called going "on and off" or a "bump". This may also occur on a very quick ball-reversal (diagram F).
X1 and X3 are the weakside defenders. X1 should play the gap between the high post (with a presence in denying the high post) and the point. X3 must have his/her back to the baseline, in a good defensive stance with "head on a swivel". He/she has to be able to see the floor, e.g. a backside cutter, a pin-screen or wing-corner skip-pass.
Trapping the Wing - "Fist-2" or "Fist-3"
If you have quick athletes, try this defensive stunt. See the diagram below. X1 will pick up the point guard O1 high and force O1 to dribble to the side of the defensive call... "Fist-2" to the right, "Fist-3" to the left.
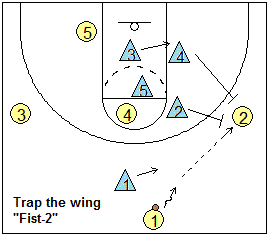
Start the opposite low defender X3 in the middle near the basket, so he/she can quickly rotate to the right block. X4 starts "cheating up" toward the wing. X2 lets the pass go to O2. Then X2 and X4 quickly close-out and trap O2. X1 denies the pass back to O1, X5 denies the high post pass, and X3 denies the pass to the block.
It's "one trap and out". If the offense breaks the trap or passes out successfully, just drop back into the usual 2-3 zone.
Ball in the corner, or short-corner.
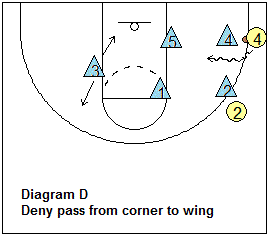
See Diagram D. The outside low defender on the ball-side will cover the corner and short-corner. It's imperative that the X5 defender must slide over immediately into the low block vacated by X4. If X5 does not get there in time, the offense may get an easy pass into the low block, and a lay-up.
X2 denies the pass back to the wing (their best shooter) while X1 covers the ball-side elbow (high post). If O2 is not a great shooter, have X2 sag inside the paint to help prevent O4 from dribble-penetrating (diagram D).
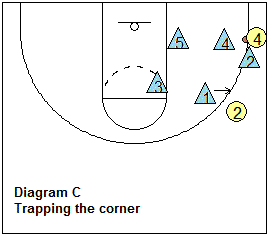
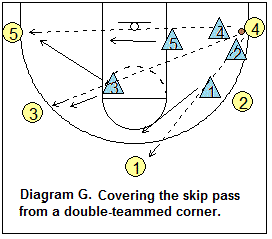
See diagram C. The corner is a trapping opportunity if you have the quickness to do it. In addition to the outside low defender (X4) coming out, the top ball-side defender (X2) will sprint down to trap the corner. X1 denies the pass back to the wing and X3 covers the elbow (high post). The long skip pass to the opposite wing is covered by quick reversal with X3 sprinting to the ball and X1 dropping to the high post (diagram G)
Pass into the high post.
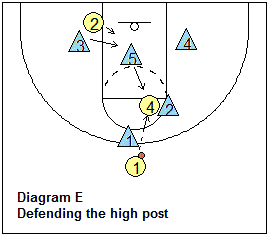
Diagram E shows the X5 defender moves up to defend this. But watch out for an underneath cutter in the paint. The X3 and X4 defenders cheat into the paint when X5 moves high.
Defending the point.
Defending the point is always problematic. If you know that their O2 guard is their best shooter, then have X1 defend the point at first and allow X2 to hedge toward their good shooter. And just the opposite applies if O3 is their best shooter. At first you may decide to defend the point loosely, but if O1 starts hitting some shots, you've got to get pressure there.
Never let their point guard split the X1 and X2 defenders and dribble penetrate the middle. X1 and X2 have to move quickly, work hard, and work together in order to cover the point, both wings, and give help in the high-post.
Trapping the Point
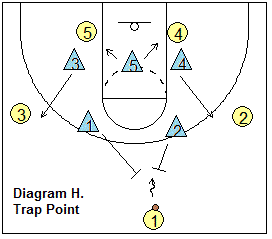
Diagram H below shows an aggressive "surprise" trap on the point guard. X1 and X2 run out and trap O1 as soon as O1 brings the ball across half-court. X3 and X4 run out and deny (or intercept) the pass to the wing. This is a gamble, and you may get an interception or a turnover, especially if the offense is in a 3-out, 2-in set (no high post). This is not something you would do all the time, as you could get burned by a quick pass from O1 to the high-post (free-throw line). You might make this a defensive call, like "Red" or "Hot".
Covering the Skip Pass
Covering the skip pass from wing to wing, has been discussed above (diagram F). A skip pass from wing to opposite corner would be covered by the ball-side low outside defender.
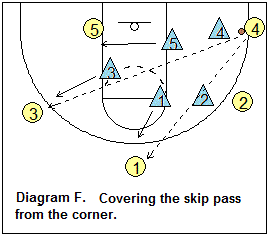
Covering the skip pass from the corner to the opposite wing depends upon whether or not you have double-teamed the corner as in Diagram C. In the usual single-coverage (Diagram D), a skip pass from the corner to the opposite wing is covered by the opposite low outside defender (X3) who has back-side responsibility. Sometimes a quick athletic X3 can anticipate the skip pass, intercept it and go for a lay-up.
For example, in diagram F, as the ball is passed from the right corner to the left wing, X3 covers the receiver until X1 can rotate over, and then X3 will drop back down low ("on and off"). If the skip goes from the corner to the point, X1 should cover this (diagram F).
If you have double-teamed the corner (Diagram C), a long effective skip pass is less likely, but in this case would be covered as follows (see Diagram G):
1. Pass from right corner to left corner or wing... X3 takes the ball.
2. Pass from right corner to point... X1 takes the ball.
Players sometimes think playing a 2-3 zone defense is easier than man defense, but in fact, to play good zone defense, you may have to work much harder to be effective.
Coach Jim Boeheim - Syracuse:
Related pages:Al Marshall on Weak Side Defender Rules from: Creating a Dominant 2-3 Zone Defense
- Principles of Zone Defense
- Aggressive 2-3 Zone Defense
- Breakdown Drills for Teaching the 2-3 Zone Defense
- 1-2-2 zone defense (and 3-2)
- 1-3-1 zone defense
- Amoeba Defense
- Point-Zone Defense
- Match-up zone defense