


Basketball Defense - Man-to-Man Pressure Defense
By Dr. James Gels, From the Coach’s Clipboard Basketball Playbook"Helping coaches coach better..."

Contents
Man-to-Man Defense - Force to the sideline and baseline.
We teach on-ball defenders to force the ball toward the sideline and then down to the baseline. On the baseline, we stop penetration and try to trap. Forcing the ball to one side allows you to establish your helpside defense. When the ball is at the top of the key in the middle, the low defenders must play "straight up" and you have to defend the entire court.But once the ball goes to the side, weakside defenders move into helpside position (see below), deny the pass into the post, and help prevent dribble-penetration. When the ball is in the corner, we only have to defend half of the court and can load all five defenders on that side. On a long skip pass to the opposite side, there is usually enough time (while the ball is in the air) for the defense to quickly rotate back.
How do you force the ball to the side? The on-ball defender at the top of the key, or on the wing, must close-out on the ball-handler with his sideline (outside) foot back and the middle (inside) foot forward. Have the defender put a little more of his/her weight on the front foot, so that if the ball-handler makes a quick dribble move toward the outside, the defender can push back off that front foot more quickly.
Some coaches deny the point to wing pass, but for us it makes more sense to let the pass go to the wing since we want to force to the side. Once the ball is on the wing, we deny the pass back out to the point, and force the ball even further into the corner.
Now realize that most often the pass to the low post comes from the wing. And once the ball gets into the low post, bad things can happen... they either score or we foul. So it is important to teach the post defenders to front the low post as the ball moves to the wing and corner areas. We must deny that pass into the post.
But what about the "over-the-top" lob pass? First, this is a difficult pass to consistently complete - it is often thrown too high and out-of-bounds. When this pass is made, the opposite low post defender (in "helpside") immediately rotates over to double-team that pass, while the opposite wing defender (who should already be inside the paint in helpside) rotates down to cover the opposite low block.
Man-to-Man Defense - Deny the Wing Pass?
I sometimes hear coaches discussing which is a better defensive strategy, to allow or to deny the pass from the point guard to the wing.Some believe the wing defenders should play "on the line" and prevent the pass to the wing player. By denying the pass to the wing, you may be preventing one of their better shooters from getting the ball.
Also, since the entry pass to the low post most often comes from the wing, you make it more difficult for the offense to get the ball inside by contesting two passes (the point to wing pass, and the wing to low post pass). The disadvantages of this strategy include (1) the wing defender getting beat by the back-cut, and (2) dribble penetration up the lane by point guard who can shoot or dish off to the low post.
On the other hand, some coaches want to get the ball out of the point guard's hands and allow the pass to the wing uncontested, and then deny the pass back to the point guard. This philosophy has the ball getting into the hands of players who may not be as skilled as the point guard. This helps stop the point guard from being a big factor, but may allow easier access to the low post.
So which philosophy is best? As is often the case, I think you have to be flexible and adapt your strategy according to the team you are playing. If your opponent has strong wing shooters, or likes to get the ball into the low post with a pass from the wing, then deny the wing pass.
If the opponent's strength is their excellent point guard who likes to dribble penetrate, then pressure the point guard, have wing defenders X2 and X3 sag inside more (deny the seam), and allow the pass to the wing. Then aggressively deny the pass back to the point and keep the ball out of his/her hands.
Man-to-Man Defense - Keeping pressure on the ball, on-ball defense.
Pressure the ball at all times. This will cause turnovers and harass outside shooters.Assume the stance described above, forcing toward the baseline, and focus on the belly-button. Don't get your feet crossed unless you have to sprint back. Avoid "reaching-in" and taking a swipe at the ball, as this causes the defender to lose balance and the defensive stance. Reaching-in also leads to fouls. Keeping pressure on the outside harasses the offensive player, making it difficult to see the floor and open teammates.
An important part of denying the pass into the low post is keeping pressure on the ball, making it difficult to make that pass. But won't playing up tight on the ball-handler allow him/her to beat the defender with a dribble move? Yes and no... read about "help and recover" below.
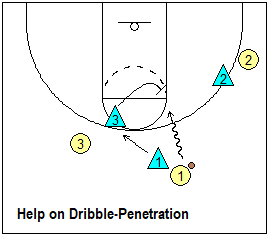
The principle of help and recover is important in denying dribble-penetration, once again pointing out that man-to-man defense is a "team defense", not just individual man-on-man. Also, our helpside low defenders should be in position to stop dribble-penetration, but at the risk of leaving an unguarded low post player. So our outside defenders have to work together with help and recover to keep the ball outside.
Man-to-Man Defense - Defensive positioning off the ball - Deny, Helpside, Help and Recover
See Diagram A below. Pretend there is an imaginary line up the middle of the court called the "helpside line" (red line). Also imagine a line drawn from the ball to each offensive player (green lines). We like to have our defenders one pass away from the ball in "deny", playing "on the line" (see Diagram A). This is especially true if we want to deny a pass back out of the corner to the wing, and from the wing to the point. As discussed above, depending on your coaching philosophy and the opponent's strengths, you may or may not want to deny the pass from the point to the wing.
Defenders whose man is two passes away are in "helpside", and are "up the line" sagging into the lane (paint) area. Helpside positioning almost looks like a zone away from the ball and puts our defenders in a better position to help prevent inside passing and dribble-penetration.
Helpside defenders should never lose sight of their man and should use their peripheral vision to always see the ball and their man. Some coaches call this the "pistols position" pretending that your index fingers are pistols, with one pistol pointing at the ball and the other pointing at your man. Some use the term "ball-you-man" to emphasize this point.
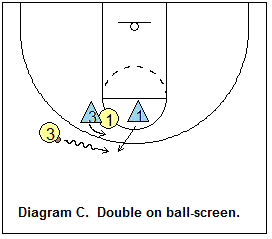
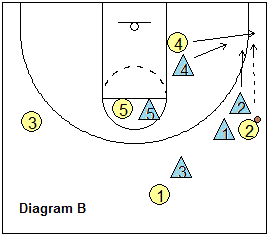
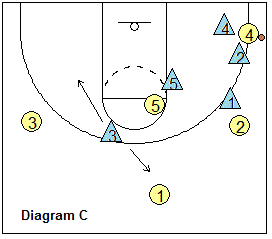
Once the ball gets in the corner, all helpside defenders should have one foot on the helpside line (Diagram B). You can see in this diagram that our X5 defender is in a good position to slide over and provide backside defense to the over-the-top lob pass to O4. And X4 is in a good position to deny the pass to O4 and also deny dribble-penetration by O2 (Diagram C).


Notice how X5 and X3 rotate in this situation. Also notice in Diagram B, that whenever the ball is below the free throw line, the helpside defenders should have one foot on the helpside line.
Now in Diagram D below see how the defense shifts and rotates on the "skip pass" across court to O3. Not shown in the diagram, if O4 flashes to the ball-side elbow, X4 will move up and try to keep a hand in front denying O4 that pass, while X2 (in helpside) can drop down a little lower in the paint in the event of the over-the-top lob pass to O4.


Help and Recover
Diagrams E and F teach how to help and recover on the perimeter. This is necessary because when you play tight pressure defense on the ball, there are going to be times when the on-ball defender gets beat off the dribble. To stop dribble-penetration, the adjacent perimeter defender gives help, hedging toward the ball, preventing the dribble move.Here is a tip: if you are playing against a team with a very good penetrating guard, rather than playing a "full-denial", defenders one pass away can play a little up the line and step or two toward the ball in order to help stop the dribble penetration. On the other hand, if one of the help defenders is guarding their star outside three-point shooter, you would probably rather keep that defender in a deny position and not leave his man to give help. It helps to know your opponent.
In Diagram E, O3 tries to dribble-penetrate. The X1 defender gives help and O3 is prevented from penetrating, and has to dish back out to O1 (Diagram F). The X1 defender then has to rotate quickly out to on-ball defense on O1, and the X2, X3 and X4 defenders are now in deny, while the X5 defender moves into help-side (Diagram F). Important teaching point: in teaching help and recover, you must drill your help defenders to move their feet quickly to establish position to prevent the dribble move. They must not simply "reach-in" and take a swipe at the ball.
"Defense is all about helping. No one can guard a good dribbler, You have to walk kids through how to help and then how to help the helper." - Bob Knight
From "Bob Knight: The Complete Guide to Man-to-Man Defense"
Man-to-Man Defense - Point-guard dribble-penetration.
I personally believe that the two main things that cause problems for man-to-man defense are (1) point guard dribble-penetration, and (2) the pass getting into the low post. In both situations, something bad usually happens... a basket or a foul.We prefer to give up outside jump shots, not lay-ups and free-throws. It's important to keep guards from penetrating from the top. First, when the ball is at the top (in the middle) there is no helpside defense established, since all defenders must play their own man in deny at that point. So when the point guard penetrates, one of our low post defenders has to rotate over, leaving his/her man open, and he/she may foul the point guard.
We want the point guard defender to play fairly "straight-up", and even over-guard the offensive player's right or left side, depending on which way he/she likes to go. The point defender must work hard with good footwork and stay in front of the offensive player.
We often have to make adjustments depending on the offense's strengths and weaknesses. If their point guard mainly is a penetrator, we have our point defender back off a step and invite the outside shot instead. We have our wing defenders "hedge" and give "help and recover" in trying to deny dribble-penetration. Wing defenders move a little "up the line" into the gaps (see diagram), seeing the ball and their man, without getting beaten by the wing back-cut.
When the on-ball defender is beaten, the adjacent perimeter defender sprints over to stop the dribble, switching with the original on-ball defender. In the diagram below, X1 gets beat, so X3 stops O1's dribble as X1 now takes O3. This is better than expecting an inside post defender to stop the dribble, as this often leaves the opponent's post player open for an inside pass.

Man-to-Man Defense - Baseline dribble-penetration.
We deny dribble-penetration along the baseline. See the diagrams below. In diagram A, the on-ball defender X2 forces the dribbler to the baseline. The low post defender X4 (who is fronting the post on the baseline side) immediately rotates to the baseline, stops the ball, and double-teams with the wing defender X2.Meanwhile, the opposite post defender X5 rotates to cover the vacated post player O4, while the opposite helpside wing defender X3 drops down to protect the weakside. Once the ball is trapped at the baseline, we go for the five-second count, and anticipate and intercept a bad pass (diagram B). Notice that X1 gets in the gap between O1 and O3, looking to intercept a pass, or contain on the skip pass.


Diagram C shows a more frequent situation. O4 has moved up to the elbow, to clear-out for O2's move to the hoop. Here, X5 immediately rotates to stop O2 along the baseline, while X3 drops to cover the weakside.
This works very well, but you must drill this in practice so it becomes automatic. The most common errors are X5 and/or X3 rotating too slowly. X5 should be moving out as soon as he/she sees O2 starting the dribble to the baseline. And as soon as X3 sees X5 leaving, he/she must drop down inside.
Man-to-Man Defense - Defending post players.
We try to deny the pass into the low post. When the ball gets in the post, the opponent either scores or we foul. When the ball is on the top (point), our post defenders full-front with both feet above the offensive player, with one hand on, and the other hand up to prevent the lob.As the ball is passed to the wing, the post defender quickly drops under and around (not over) the offensive player, to half front from the baseline side. With our post defender X4 on the baseline side, if O4 actually receives the pass, X4 is in position to deny a drop-step move to the baseline (and will get help from the top X3). Additionally, X4 is in good position to stop baseline dribble-penetration.


Some coaches completely full-front the low post. We do that only if our post defender is much smaller than the offensive player, such as when the offensive post player is a giant, or after a switch on a screen and we're caught with a smaller guard defending their post player. We defend the post lob by (1) the wing defender on the ball pressures the ball to make the pass difficult; (2) the opposite helpside post defender rotates to defend or tip the pass; (3) our helpside wing defender drops down to cover the back-side post.
If the ball is passed back out to the point, X4 will quickly slide under and around O4 (not over) and again full-front when the ball is at the top. Our post defender slides under (rather than over) the offensive player because if X4 went over, he/she could be sealed outside, and be vulnerable to a quick pass inside. Also, sliding under gives us inside rebounding position. Your post defenders must work hard with good footwork to accomplish this.
We also want to keep the ball out of the high post (elbow or free-throw line area). Here we will 1/2 or 3/4 front the high post. The technique here is for the defender to keep his feet between his man and the basket but have one arm and hand wrapped around in front of the high post player in the passing lane.
Double-teaming a dominant low post player. See the diagrams below. Against a star post player, 1/2 or 3/4 front as usual from the baseline side. If the ball does get into the low post, double-team it with your helpside wing defender (X3). X4 prevents O4's baseline move while X3 stops the move to the lane. X2 denies the pass back out to O2. X1 slides into the gap between O1 and O3 to cover the skip pass.


Some teams double-team by having X2 (ball-side wing defender) slide down inside to double-team. We don't like this for two reasons:
(1) Usually X2 is too slow getting there, and has a bad angle in preventing O4's move to the lane.
(2) This leaves O2 wide-open for a quick pass back outside and an open three-point shot.
Defending this way keeps our weakside post defender X5 on O5, (no size mis-match). Notice that this rotation is different from baseline dribble-penetration (where X5 sprints over to the ball, and X3 drops to the backside).
This is preferable to double-teaming with the opposite post player, as that would leave the remaining offensive post player unguarded, or guarded by the smaller X3. Using the opposite wing to double may make you susceptible to the opposite wing kick-out and three-pointer (diagram C). To defend that outside shot, the X1 defender closes-out on the skip pass, and takes the ball. If the pass goes to O3, X1 takes O3, while X3 sprints out to take O1. We call this a defensive "X-cut". X2 moves into helpside.

See Trapping the Low Post. Also see below about defending inside, post screens.
Man-to-Man Defense - Defending cutters.
Another important point is to deny the pass to a cutter moving through the lane. Here the defender must try to keep between his man and the ball, denying the pass.One technique the defender can use is to "bump the cutter" off his/her intended pathway by getting position and riding the cutter away from the basket. "Bumping" may not be a good term as it implies "hitting" the cutter, or something with contact. Rather, it means getting inside position on the cutter, or at least an arm in front in the passing lane, much like ½ or ¾ fronting a post player.
The defender tries to beat the cutter to a certain spot on the floor, which really is no different than two players fighting for rebounding position… both are entitled to that spot on the floor, it just depends on who gets there first. So the defender must use good footwork and establish position... you cannot simply push or hold the offensive player.
Examples of cuts to defend against are the "give and go" cut, a cut from the weakside wing (either with or without a screen), flash cuts to either high or low post, back-cuts, etc.
An important point is the concept of "jumping to the ball" (see left diagram below). As the ball moves (either pass or dribble), defenders should "jump to the ball", or move a step or so toward the ball. Not only does this help deny the pass, but also puts the defender in the cutter's path and the defender has a better chance of bumping and denying the cutter. All defenders should learn to react to every movement of the ball.

One special circumstance... defending the curl cut. See the diagrams below. A good quick guard will sometimes run down low and curl around a post player in order to lose his man. We believe the best defense here is for the defender to "chase" the offensive player around the screen as closely as possible.


Sometimes I'll see the defender instead just drop back outside thinking the cutter will be coming back out to his original spot or the perimeter. The right-hand diagram below illustrates the error in this thinking. A good offensive player will read this and pop out to the corner instead for the skip pass and open three-pointer.
Man-to-Man Defense - Defending screens
You must have a plan for defending screens. Of utmost importance is communication between defenders and calling out the screens before they are actually set. Coaches differ on the best way to defend screens. No matter how you do it, you must have a plan, practice it, and make sure all players understand.Inside post - post screens should be switched, since you usually do not end up with a size-quickness mis-match (see below). On outside perimeter screens, you must decide whether you want to switch these screens, try to fight over them, or slide through (under) them. Switching on the outside could occasionally lead to size and quickness mis-match, especially if a post player steps outside to set a screen for a guard.
On-ball screens (Pick and Roll).
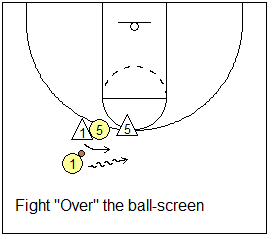
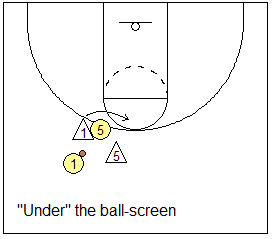
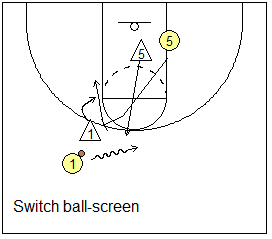
See this page, "Defending the Pick and Roll", for numerous ways to defend this situation. I believe you must pick one method that you think works best for your team, and get really good at it.Coaches differ on how to defend ball-screens. Here are a few ways to do it... "over", "under", and "ice" techniques.
"Over" (no switch)... with "over", the screened defender aggressively fights over the screen by getting into the ball-handler while also stepping his/her inside leg over the screener. This method avoids switching and "big-little" mismatches. The disadvantage is that if the screened defender does not get over the screen, the ball-handler gets loose to shoot or drive. This possibility can be mitigated by having the X5 defender "show" over the screen to contain the ball until X1 can recover. When X5 shows over the screen, this forces the ball-handler away from the hoop and allows X1 to get over the screen more easily. X5 then quickly recovers to O5 with high hands to deny the pass.
"Under" (with a switch)... here the screened defender X1 goes under the screener. The disadvantage is giving up the open outside shot by the ball-handler. To avoid this and to pressure the ball, we "jump-switch" with X5 sprinting above the screen to pressure and contain the ball. So a switch occurs with X1 on O5 and X5 on O1, possibly resulting in size and quickness mismatches. We have also used this jump-switch technique for defending hand-off screens (weave screens).
Coach Andrew Grantz switches all pick and rolls and aggressively attacks the ball. As X1 feels contact from the screener, he/she quickly spins around the screener in order to get position to deny a pass to the screener (see the video below). Meanwhile, X5 aggressively sprints above the screen to the ball and "goes for the ball"... trying to deflect or steal it. This usually results in the ball-handler having to take a couple dribbles back away from the hoop, and hence prevents both the outside shot and the dribble-drive.

"Ice"... as with all pick and roll plays, communication is key. The post defender X5 yells out the screen and "ice". The ball defender X1 immediately steps up to deny O1's middle dribble-penetration, forcing to the sideline. X5 sprints up, squares up the ball-handler and with X1 contains the ball-handler, or forces to the sideline, never allowing the middle. At this point, X5 should not feel responsible for O5 and in fact does not leave O1 until either (1) O1 picks up his/her dribble, or (2) X1 calls X5 off.
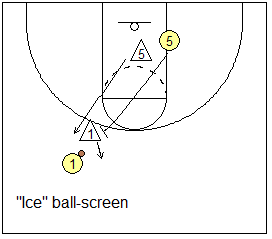
Then X5 recovers by sprinting to O5 with high hands to stop the pass from O1. X5 could get help from X4, X2 and X3 as seen in the diagram.

Outside Lateral Screens
It is easy to switch these screens and usually a mis-match does not occur. The interesting thing is that since our wing defender (X3) is in helpside, there really in no-one to screen (diagram H). It becomes more of an exchange. When O3 moves out to the top, we switch, and have X1 take O3. Notice (diagram I) that our X3 defender in helpside, doesn't even need to move on the switch, since the ball is on the opposite wing and she/he just says in the paint in helpside.


If our weakside wing X3, for some reason, is not in helpside and gets screened (diagram J), we switch this screen. The screened defender X3 drops a step or two back just before the screen arrives ("steps under") and avoids getting sealed outside by the screener... a "step under and switch".
Inside Post Screens
As stated above, it is best to switch inside screens. Here you are usually not giving up a size or quickness advantage, and switching gives us the best chance to deny the pass into the low post.When defending inside, lateral post screens, the screened defender always "steps under" (takes a giant step back toward the baseline) - diagram K.


If the cutter goes low (baseline side), the screened defender gets an arm bar up and stays with her/his man (no switch)... "step under and stay" (diagram K2). The key is... the defender getting screened must step back toward the baseline before the screen actually arrives.
If the cutter goes high (over the screen), then the defenders switch... "step under and switch" (diagrams L and L2). Again, the screened defender always steps-under (toward the baseline) just before the screen arrives.
The danger with any inside lateral post screen is for our screened defender to get pinned inside. This should not happen if the screened defender "steps under" the screen. After stepping-under, she/he can easily get into the ½ fronting position from the baseline side.


Again the rules for defending lateral inside post screens are:
- The screened defender always steps under before the screen arrives.
- "Low cut" (the cutter goes low) = step-under and stay.
- "High cut" (the cutter goes high) = step-under and switch.
- We also "step under and switch" when defending inside post screens on baseline out-of-bounds plays.
Down-screens
We defend down-screens by following in the cutter's footsteps, as we chase around the down-screen, and do not switch. This is similar to how we defend the curl cut, where we chase the cutter and do not switch.See the two diagrams below. Why not just switch the down-screen? - as the X2 defender is in perfect position to pick up the cutter O4 coming around the screen, and X4 is in good position to take the screener O2. Two problems could arise. First, after the switch, you could have a big-little mismatch. Second (see the diagram to the right below), the cutter may read this switch and instead flare out to the short corner for the pass and open shot, as X2 is caught inside. So we believe it is better not to switch this screen and instead aggressively chase around the down-screen.


On the other hand, here are coach Fran Fraschilla's thoughts on down-screens. He wants to avoid size mis-matches. You can switch "equals" - i.e. guard-on-guard screens, and post-on-post screens can be switched. A post-guard screen that creates a mis-match, is not switched. The screened defender's teammate "opens up" and allows the screened defender to slide through, so there is no switch.
Back-screens
We switch back-screens. See the diagrams below. As O2 cuts backdoor, X4 will yell out the screen and switch, and prevent the pass inside to O2. Very importantly, the screened defender X2 must quickly step in front and around to get inside position on the screener O4, and avoid getting pinned outside. This is usually not too difficult if X4 calls out the back-screen to warn X2 that it is coming.After this switch, you may have a big-little mis-match and these defenders will switch back at the first opportunity... which may be during the next perimeter pass, especially if the pass goes weakside.


A back-screen could also happen on the perimeter - e.g. a wing-to-point back-screen, or "flare-screen", (as in our "Kentucky" plays). Again, we switch this. X1 takes the screener O2. X2 is in helpside and can stay there, unless the ball is skip passed to O1 after the back-screen.

Man-to-Man Defense - Defending Baseline Out-of-Bounds Plays
Some coaches like to zone the baseline OB play with a 2-3 zone. However, there are plays designed that can beat this defense (see "Out-of-Bounds Plays vs the 2-3 Zone"). Here is a way to play the baseline out-of-bounds situation man-to-man without getting burned inside.First, "step under" and switch any inside screens (see the right diagram below). The screened defender X4 steps under (one step back toward the baseline) to get inside position on the screener O5, in order to avoid getting "pinned".


In addition, deny the pass inside by having your inbounds defender play a "one-man zone" in the paint. In the diagram below left, X3 drops off the inbounder into the paint, looking to deny any pass inside and lay-up. But once the pass goes outside, he/she must move quickly back on the inbounder (O3), who may step out to the corner for the outside shot (below right).
Again, the rules for defending baseline inbounds plays are:- Match-up man-to-man.
- X3 plays a "one-man zone" off the inbounder denying the inside pass, but still being wary of the pass back to the inbounder.
- Step-under and switch any inside post screens.
Man-to-Man Defense - "Red" - Aggressively Trapping the Point Guard
On occasion, as a surprise tactic, try an aggressive trap on the point guard. This could occur just after O1 dribbles the ball across half-court, or when the X1 defender cuts and forces O1 to one side.Oftentimes teams do this whenever there is an on-the-ball screen. Both defenders jump out and try to trap the ball. You can call this something like "Red" or "Hot", or call it nothing and just execute it from time to time by allowing the wing defenders, X2 and X3, to read and react to the situation. See the diagrams below.
In diagram A, X1 overplays and forces O1 to the right. The wing defender X2 triggers the defense by aggressively running up and closing out on O1. X2 and X1 trap or force O1 more and more into a corner along the sideline. As soon as X2 goes up, X4 should move out to deny the pass up the sideline and X3 should deny any pass across the middle.
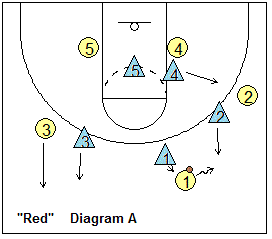
X5 must read the backside offense. X5 half-fronts the high post player, denying that pass while still being able to recover on a long lob pass to O5. Usually this long pass is not readily visible to O1 who is under extreme pressure. Defenders try to get the 5-second call, jump ball, an interception, or simply let the offense turn the ball over with a bad pass or travel.
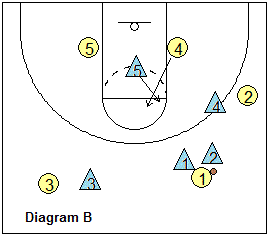
The "Red" defense is a gamble, but often is very effective if used as a surprise tactic, perhaps after a time-out, or a made free-throw, or as a special call from the bench. It might help you get a steal late in a close game. Getting steals off this can turn into breakaway lay-ups. The keys are: the trapping defensive players must initiate the action and be much more aggressive than the offensive player being trapped (without fouling), and the remaining three defenders must deny or intercept the pass out of the trap.Man-to-Man Defense - "Side-Fist" -- Aggressively Trapping the First Pass to Either Wing
Another surprise tactic, is to trap the first pass from the point guard O1 to either wing (O2 or O3). Often it is not easy to double-team a good point guard in the middle of the floor. So instead, we have X1 pressure O1, with X2 and X3 playing off their man, allowing the pass to the wing. On the first pass to either wing, we will aggressively trap along the sideline. It is easier to trap along the sideline than it is in the middle of the court.In diagram A below, the pass is made to the O2, and X2 and X1 immediately, aggressively trap. X3 quickly rotates over to deny the pass back to O1. X5 will move up toward the free-throw line to deny a pass to either the high post, or a skip pass across to O3. X4 denies the pass to O4.
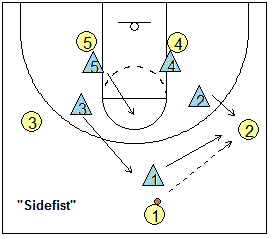
We continue to trap if the ball is passed (or dribbled) into the corner (diagram B). Here, X4 and X2 will trap, while X1 denies the pass back out to O2, and X5 denies the pass to O5 (diagram C). X3 plays half-way between O1 and O3, looking to intercept a long skip pass. X3 and X5 must always be wary of O3 making a back-door basket cut, and must drop inside if that happens.
We give up the long pass back out to O1, but never the back-door basket cut. When trapping, we are going for a 5-second call, a jump ball (although we stress not reaching in and fouling), or try to force a bad pass or turnover. Our trappers make it difficult for the trapped player to make a long pass, by "squeezing the trap" and getting their hands up high when the ball is raised up for a long pass. Sometimes, we can tip this pass.
If the offense successfully passes back into the middle of the court (to O1 or to the high post), "Side-Fist" is immediately terminated, as we do not trap at the point or the high post. We only trap along the sidelines (and baseline). It's usually one or two sideline traps and it's done. We immediately match-up man-to-man and play our usual man-to-man rules.
Use this as a surprise tactic, perhaps after a time-out, or a made free-throw, or with a new O2 or O3 substitution. Also, this can be a late game tactic, when you are behind and need a steal. Like "Red" above, it's a gamble, but as a surprise tactic, with your defenders being the aggressors, you might create some key turnovers.
Are your players lacking in quickness? Then take a look at the "Pack Line Defense".
Related pages:
- Bob Kloppenburg's SOS Defense
- Teaching Defense and How to Defend Screens by Progression
- Defending the Pick and Roll
- Basic Defense
- Shell Drill
- Man-to-Man Breakdown Drills
- Man-to-Man Positioning Drill
- 1-on-1 Drill
- Defensive Close-Outs and Drills
- Taking The Charge - Tips and Drills
