Basketball Offense - Attacking the 1-3-1 Zone Defense
By Dr. James Gels, From the Coach’s Clipboard Basketball Playbook"Helping coaches coach better..."

There are a number of ways of attacking the 1-3-1 zone defense, but most success will come with attacking from the corner or short corner, and underneath the zone. Screening the low defender and back-screening the middle defender create opportunities as well.
As in any zone offense, move the ball with good quick passing, use skip passes, look to dribble penetrate the gaps, and drive and dish (either inside to a post player, or a kick out to the opposite side for a 3-point shot).
Also, we try to take of advantage of how the defense covers the corner. Offensive rebounding is important for second and third shots, especially since there is only one inside defender.
Zone Offenses vs the 1-3-1 Zone
- "Zone-2" - adapting the "Zone-2" offense to the 1-3-1
- "Corners" - 4-Out Zone Offense
- "Zone-23" - adapting the 2-3 zone offense to the 1-3-1
Set Plays vs the 1-3-1 Zone
"Zone-2" ("Runner") - adapting the "Zone-2" offense to the 1-3-1
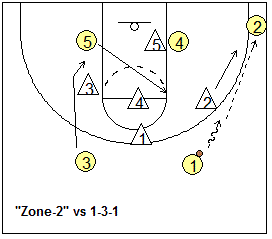
Use a two-guard front to attack the 1-3-1 zone defense, and attack it from the corner where it is most vulnerable. See the "Zone-2" offense. Put O2 (your best shooter) in the ball-side corner. O2 runs the baseline, always to the ball-side corner. Have both posts low on opposite sides of the lane.In the first diagram, O1 engages the top outside defender with the dribble, and passes to O2 in the corner. After the ball is passed into the corner, the weak-side post can flash to the ball-side elbow. If nothing is there, reverse it back out and to the opposite side.
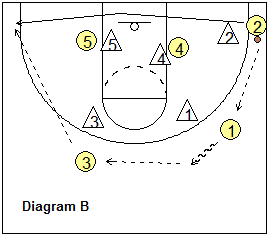
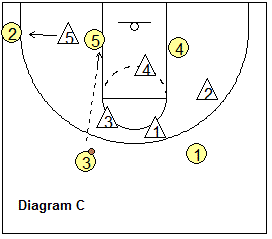
After a ball-reversal or two, things tend to open up. Notice how the corner is defended, especially after ball-reversal. In diagram C, if the low X5 defender runs out to the corner to defend O2, a quick pass to the ball-side low post is sometimes open for the lay-up - note that for this to work, O4 must "stay" on the opposite side.
"Corners" - 4-Out Zone Offense
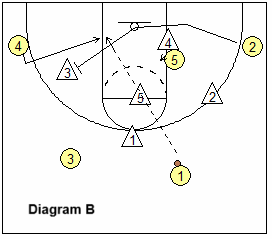
See the 4-Out Zone Offense. Notice in the diagram below how we position the 4 outside players. O1 and O3 are on top staggering the X1 defender, and O2 and O4 are below the free-throw line, half-way between the wing and the corner. O5 has a better chance of getting open on the low blocks, since there is only one low defender (X5), but he/she can move up to the elbows and high post as well.Quick perimeter passing, reversing the ball from side-to-side, and skip passing should eventually cause the zone to become over-shifted and out of position - creating open shots, chances to pass into the post, and gaps that our outside players can attack. Patience is a key.
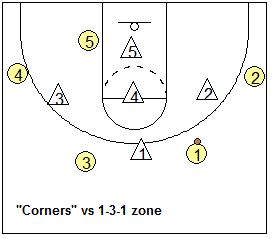
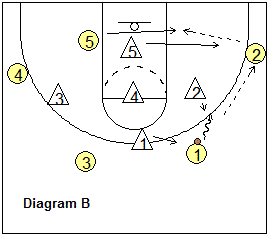
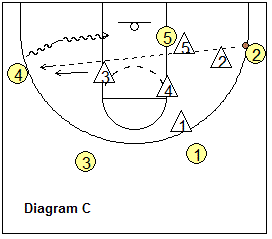
Notice in diagram B how O1 engages the top outside X2 defender with the dribble. This makes the pass to O2 easier. O2 can shoot, but if X5 runs out to defend O2, O5 might be open for the quick pass inside. Again, ball-reversal tends to open things up. Notice in diagram C, after a skip pass, O4 could shoot. But if the X3 defender flies out, O4 should shot-fake and dribble baseline for the lay-up or short jump-shot.
"Zone-23" - adapting the 2-3 zone offense to the 1-3-1
Usually we think of attacking a zone with a "one guard front" (like the 1-3-1 or 1-2-2 zone), with a two-guard offense. But we have discovered that we can use "Zone-23", our standard 2-3 zone offense, in attacking the 1-3-1 zone.The "Zone-23" offense uses a 1-3-1 set, which positions us directly lined up with the defenders, instead of in the gaps. With this, the zone defenders tend to match-up, almost like man-to-man.
A trapping 1-3-1 defense that traps the wings and corners may have a more difficult task with our "zone-23", as with three perimeter players, there is usually an easy pass out of the trap. The defense tends to "stay at home" more.
But probably the main reason this offense works is because it attacks the zone from the short corner, and below the zone, which is where it is weakest. Here, we'll discuss how to use it against the 1-3-1 zone.
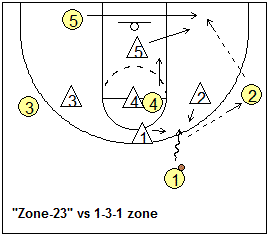
In the left diagram below, notice how O1 makes the pass to the wing a little easier, by dribbling at the X2 defender. O2 pops out for the pass. This pass is usually not too difficult, as most zone defenses don't deny outside passes very well. O5 runs short corner to short corner, always on the ball-side, and we try to pass from the wing to O5 in the short corner.
If O5 is a good shooter, we allow O5 to take the shot from the short corner, or take his defender 1-on-1 with a shot-fake and dribble-penetration along the baseline. Meanwhile, O4 seals the middle defender, and then cuts hard up the lane to the hoop for the pass from O5 and lay-up.
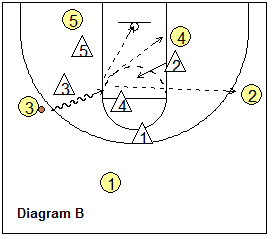
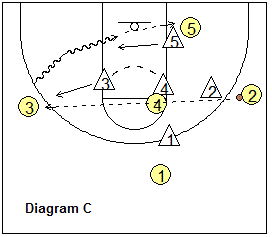
We look at penetrating the gaps. Diagram B shows how O3 might be able to attack the top seam in the zone. Sometimes we can open this gap a little with a pass fake to O2 or O1, and get the X4 and X1 defenders to lean opposite. If O3 is able to split the X3 and X4 defenders, he/she will have a 2-on-1 inside with a possible dish to O4, our weak-side post. Or, O3 might kick the pass out to a wide open O2, for the 3-point shot.
Diagram C shows a skip pass, and the zone is over-shifted. O3 might have an open 3-point shot. But if the X3 defender is flying out out-of-control, O3 should shot-fake and dribble baseline for the lay-up, or pass to O5 inside.
Set Plays vs the 1-3-1
"4"
Using an inside screen. O2 runs the baseline, always in the ball-side corner. The ball-side post (O4) is positioned halfway up the lane (diagram A), near the elbow. We once again pass to the corner. O2 can shoot the 3-pointer or dribble-penetrate the baseline.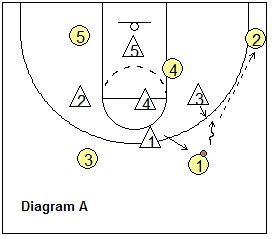
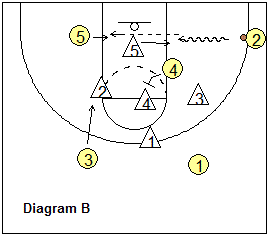
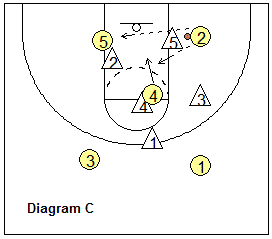
Meanwhile O4 screens the middle defender in the zone, resulting in a 2-on-1 situation with O2 driving to score, or dish off to O5 (diagram B). The screener O4 must be aware of the three-second violation, but if the initial screen is set above the free-throw line, O4 could release up the middle as another option (diagram C).
"45"
Set O3 and O4 on the blocks and O5 at the free-throw line. Use a two-guard front (diagram A). O1 draws the defense and passes to O4 who has cut out to the corner. O5 now cuts to the ball-side block for the pass (diagram B).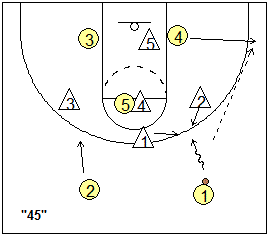
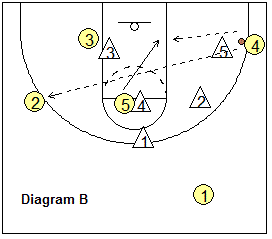
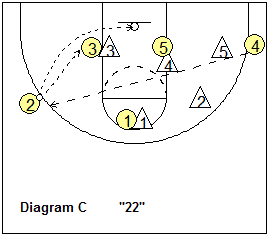
If the pass to the block is not open, usually O2 will be open for the skip pass on the opposite wing (diagram C). O2 can shoot the outside shot or pass into either O3 or O5 who should have good position after pinning their defenders.
"22"
When we are looking for a 3-point shot, we use "22". See diagram C above. Here, we run the play exactly the same as "45", but have O3 and O1 back-screen the zone so that O2 is wide open for the pass and shot."Gold"
A good 1-3-1 zone defense can be tough to crack, but "Gold" is a simple, effective play. Diagram A shows the setup. O1 and O3 pass back and forth to move the defense, and to allow O2 to drop down to the corner. On the pass back to O1, O2 sprints inside and back-screens the X3 defender, while O5 posts up to occupy the X4 defender. O4 back-cuts off O2's back-screen for the pass inside from O1 and a lay-up. If X4 slides over to defend O4, O5 will be open.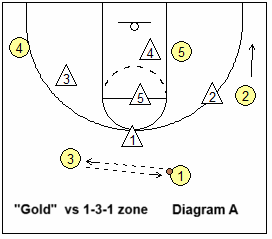
Get more 1-3-1 Zone Plays in the complete article in the Premium Members section or the Playbook download.
SIGN UP NOW FOR MEMBERSHIP! The complete article also includes:
- Plays 24 and 34
- Plays 24-Wide and 34-Wide
- Play 35