From the Coach's Clipboard Basketball Playbook
Disclosure: This page contains affiliate links, which means that Coach's Clipboard receives a small commission (at no cost to you) if you make a purchase using these links.
This article starts with the basic right and left-handed lay-up that will help young players, and then we'll look at some more complicated, advanced moves. Young players should focus on the simple lay-up technique first, and later progress to the advanced moves, the reverse lay-up, and the inside-hand lay-up, pro hop, floater, two-footed lay-ups, Euro step, and others.
On this page:
Simple Right and Left Handed-Layups
The lay-up is the easiest shot and the first shot you should learn. It's not as easy as it looks at first, as some kids have difficulty getting the correct footwork, and shooting off the correct foot. You must also learn to use either hand.Footwork
When dribbling toward the basket, move slightly to one side of the hoop to create the proper angle. If you're on the right side, dribble right-handed, and plant your left (inside) foot and jump off that foot, and finally shoot with your right hand.As you raise your right hand, your right knee should also elevate. Pretend there is a string attached to your right hand and your right knee. Reverse this form if shooting from the left side.
As you approach the hoop, take a half step with your outside foot, then take a full stride with your inside foot pushing off the court. When jumping, your outside knee should be bent. Go directly toward the basket, with your head up and eyes focused on the backboard. Go up strong and straight to the hoop. Don't shy away if there is a defender, just go strong to the hoop. You may get fouled and get a three point chance.


Aim
Use the backboard when shooting lay-ups from either side. Aim for the top corner of the box on the backboard. Focus on this area; don't watch the ball. Keep your head up.
The Push Release
Younger players who are not yet strong enough for the underhand release should use the push release. Release the ball with the back of your hands facing you. Extend your shooting arm, as you push the ball to the hoop off your fingertips. You should go up with two hands, then release the ball with your outside hand. A very young player may need to shoot the ball with two hands.
Underhand Release
As you get stronger, you should develop the underhand shot. This release results in a softer shot, and more control when you are moving at high speed. Release the ball with your palm up and arm extended. Let the ball roll off your palm and then your fingertips, and lay the ball softly off the backboard. Use two hands going up, but then release the ball with your outside hand at the top of your jump. Be strong and concentrate - "finish"!
Two photos showing game-speed, underhand release lay-ups.

Right-handed lay-up

Left-handed lay-up
Right-handed lay-up
Left-handed lay-up
Simple drill for teaching the footwork
Have the players get into a line near the right side of the basket (to shoot the right-handed lay-up). Each player takes a turn. You can use more than one basket if you have enough assistants to watch each player's technique. This drill works on correct footwork.Have the player (with a ball) face the right side of the backboard with both feet together. Then have her take one step forward with the inside (left) foot, plant that foot and jump off of it and shoot the right-handed lay-up. When jumping, the right thigh comes up with the knee bent. Have each player work on this technique.
Then try it on the run (without dribbling), and then with dribbling. Do the left side also - on this side you step forward and plant the right (inside) foot, and raise the left thigh and leg.
Using the Off-Hand to Protect the Ball
Look at the video below of the great Caitlin Clark (Iowa). If you have a taller shot blocker challenging your finish, try this extended underhanded layup, extending the shooting arm well forward out of the reach of the shot blocker. And use the off hand to ward off the defender's reaching in or over. Use the off arm as an "arm-bar" - you can't use it to push off for separation. This finish requires lots of practice reps, with and without a defender.Reverse Lay-ups
The reverse lay-up is another important fundamental. There are two types, the (1) outside hand reverse lay-up, and the (2) inside hand reverse lay-up. With the reverse lay-up, you finish the shot on the opposite side of the basket from where you started. So, if you dribble in from the right wing or corner, you actually go beyond the hoop and lay-up it up from the left side of the hoop.And from the left wing or corner, you shoot the ball from the right side of the hoop, using the right corner of the backboard. By using this technique you can prevent the shot from being blocked by keeping your back to the defender when you shoot, and by using the basket itself as a shield from the defender.
The footwork for the outside hand reverse lay-up goes like this. If you are coming in from the right side, you will essentially be shooting a left-handed lay-up on the left side using the same footwork you would use for any left-handed lay-up - plant and jump off your right foot (inside foot) and your left knee and leg come up.
Coming in from the left wing, you go under (beyond) the hoop and shoot a right-handed lay-up using the standard footwork for a right-handed lay-up (plant and jump off the left, inside foot, right leg comes up).
This takes some practice. You have to learn to have an awareness of where you are under the basket. You don't want to get caught short where you can't reach the opposite side of the rim. Get the ball high up on the glass - many misses come up short. You will need to learn how to spin the ball off the backboard, and be able to do it when you draw contact and get bumped inside. Coaches love the "and-1", a made lay-up followed by a free-throw.
On the inside hand reverse lay-up, you plant the outside foot, angle your body 45 degrees from the backboard, and release the ball with the inside hand high off the backboard. So when approaching from the right side, plant your left foot, and release the ball with the right hand. This shot is harder for the defender to block.
When doing lay-up drills, add some reps of reverse lay-ups from both sides.
Inside Hand Lay-up
The inside hand lay-up can be used when you sense that the defender is trying to block your lay-up. Use the inside hand (left hand on the right side, and right hand on the left side), and lay it in under the defender's arm. This is a more advanced level move, but a great one to add to your ansenal, especially when a shot blocker is chasing you on a break-away lay-up.When approaching the basket, instead of planting the inside foot (left foot for right-handed lay-up), you plant the outside right foot while extending the inside left hand forward to lay the ball off the glass.
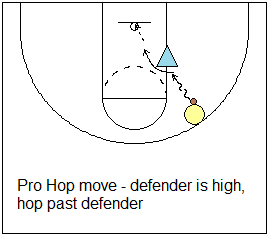
"Pro Hop" finish
This time imagine you are approaching the hoop at full speed and there is a defender already there waiting for you. Use the pro hop. Dribble at the defender, then suddenly stop and hop sideways (if the defender stays back) and jump-stop in the paint for the pull-up jumper. If the defender initially moves out toward you, then instead of hopping sideways, hop straight past him/her toward the hoop for either a short jumper, or a lay-up. Very importantly, when making the hop keep the ball high across your face so the defender cannot slap it away.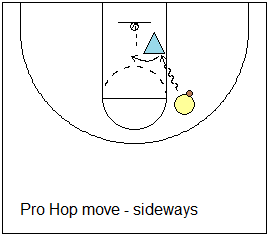
Pro Hop finish and inside hand finish with Coach Joe Wootten:
Coach Wootten's Basketball Camp: Footwork and Finishing Drills:
"Floater" ("Runner") finish
The floater is used when you dribble-drive around your defender, but there is a big, tall defender waiting inside to block your shot. Use the floater to launch the ball high over the defender's outstretched arms and hands. Stop short of the big defender, under control, and avoid the charge.You have to practice this a lot to get good at it. Develop touch for the shot, as you could be shooting this anywhere from the mid-lane area to just inside the free-throw line - so the distance may vary. And the height of arc may vary depending upon the height and reach of the defender. It is a low percentage shot for someone who has not practiced it a lot.
There are two ways to execute the floater, either the one-footed or the two-footed floater. And you can shoot it either right or left-handed.
For the one-footed floater, use the same footwork as a standard simple lay-up. If you are shooting with your right hand, plant and jump off the left foot. Go high into the air as vertical as possible to stop your forward momentum. Using the "push" release described above, release the ball with a soft touch in a high arc over the defender.
With the two-footed floater, land a two-footed jump-stop to slow your momentum, and then spring up high for the floater.
Related pages:
Want More Coaching Content?
Get access to more complete articles, diagrams, and coaching tools with Premium Membership.
View Membership Options