From the Coach's Clipboard Basketball Playbook
The page presents a simple motion zone offense used by Coach Tara VanDerveer, Stanford University Head Women's Basketball Coach. Coach VanDerveer's teams have won over 700 games, and won the NCAA Championship twice (Stanford 1990 and 1992). Coach VanDerveer has been named NCAA Coach of the Year three times, and Pac-10 Coach of the Year nine times. She served as 1996 US Women's Olympic Team Head Coach and won the Gold Medal. Coach VanDerveer is a member of the Women's Basketball Hall of Fame (2002).

Coach Tara VanDerveer
See this video of Coach VanDerveer explaining the motion zone offense. I have diagrammed it for you below.
Stanford Motion-Zone Offense
Below are diagrams of the offense presented in the video by Coach VanDerveer. This is a "patterned zone offense" and could be used not only by higher level teams, but also is simple enough that it could be taught to youth teams. It uses the basic 1-3-1 set, attacking from the short corner, which works well against the 2-3 zone defense (the most commonly used zone defense).In diagram A, we are in a 1-3-1 set, but we have O4 move to the corner. O1 passes to O2 (diagram B), and O5 posts-up above the block. O2 passes to O4. This causes the outside low defender X4 to come out and guard the ball. O4 dribbles up, taking the X4 defender along, as O2 cuts around O5 to the ball-side short corner. O2 is often open here for a pass as the X4 defender has moved outside.
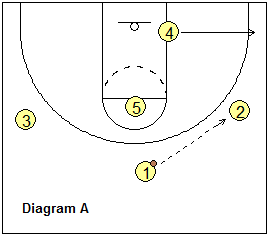
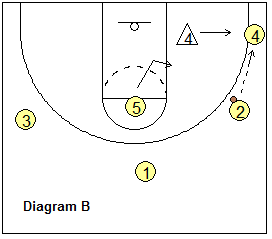
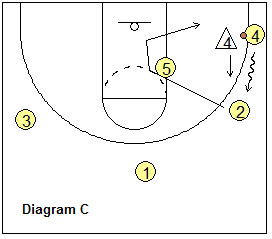
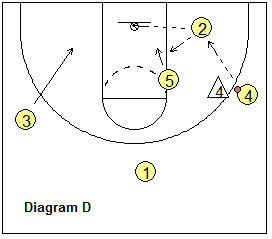
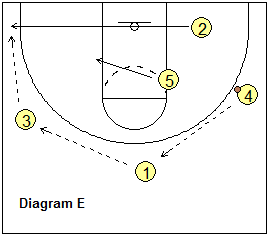
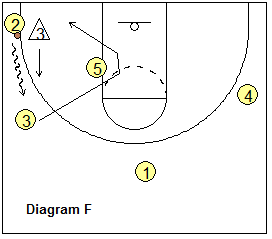
A quick pass to O2 might produce a shot (diagram D), or O2 could dump a pass into O5 for a lay-up. O3 could also be open on the back-side of the zone. If the pass to the short corner is not open, O4 reverses the ball to O1 (diagram E), and O1 passes to O3. O2 sprints to the ball-side corner (left), and O5 now posts-up above the left block. O3 passes to O2 in the corner and cuts around O5 to short corner (diagram F), as O2 dribbles up to the wing (taking the X3 defender along).
If the pass O3 in the short corner is not open, O2 reverses the ball to O1 (diagram G), and O1 passes to O4. O3 sprints to the ball-side corner (right), and O5 now posts-up above the right block. In diagram H, the pass does not go to the corner, but back out to O1. In this case, the wing O4 cuts through to the opposite corner as the ball is reversed to O1 and then to O2. O3 rotates up to fill the wing.
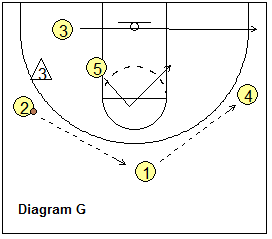
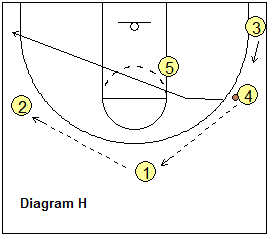
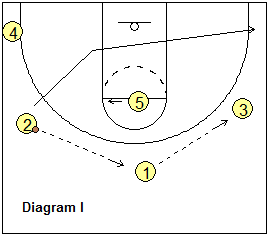
Diagram I once again shows the corner pass denied, so the ball is reversed back to O1. The rule here is that if on ball-reversal, if the ball is not passed to the corner (but back to the point instead), the wing O2 cuts through to the opposite corner, as O4 rotates up to the wing. Notice also that with O5 at the high post, the wing O2 cuts low to the corner. In diagram H, O5 was on the low block, so the wing O4 cut high over the post player.
In addition to attacking from below the zone (short corner), we want our point guard O1 to attack from the top as well. This might be just a simple dribble-penetration splitting of the two top defenders for a jump shot just inside the lane, or we could run a play as seen in diagram J.
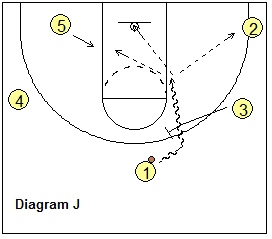
Here we start with O5 at the weak-side short corner and O4 in the ball-side corner. O2 ball-screens the top right defender and O1 dribbles-hard around this screen for a pull-up jump-shot near the right elbow. O1 could also pass to O5 pinning inside, or to O4 in the corner.
Counter for the Corner Trap
A youth coach (7th graders) wrote in that he had a problem running this offense when the opponent aggressively trapped the corner pass. This is done by the top defender X1 trapping with the low outside defender X4 (diagram K). A quick pass back out to O2 (or O1 if O2 has already made the inside cut) is the remedy, followed by either dribble-penetration or quick ball-reversal to O3 for a shot.But the trap could look like diagram L where X2 denies the pass back to the wing. Youth teams would have a problem here since most young kids are not strong enough to make the skip pass all the way from the corner out to the top or to the opposite wing O3.
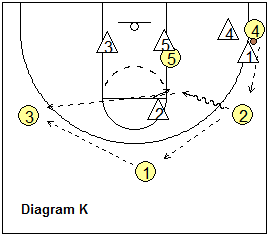
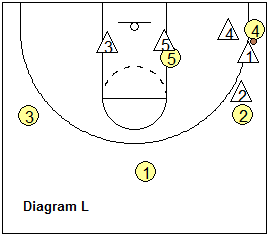
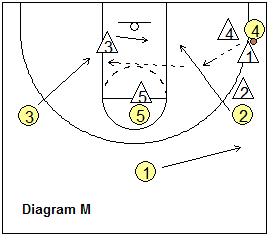
Diagram M shows a counter to this aggressive trapping. O5 stays at the high post. With the X2 defender overplaying and denying, O2 back-cuts hard to the hoop for the pass from the corner, and now we have a 2-on-1 situation with the X3 defender. O3 cuts in from the weak-side for a possible dump pass from O2. As soon as O2 cuts, O1 moves quickly to the ball-side wing. If the pass to O2 cutting through is not open, O1 will now be open on the wing as the X2 defender will tend to trail inside with O2 on the cut, freeing up O1 on the wing.
Want More Coaching Content?
Get access to more complete articles, diagrams, and coaching tools with Premium Membership.
View Membership Options