From the Coach's Clipboard Basketball Playbook

The "box and 1" defense is a commonly used "junk defense", or combination defense. The defense sets up in a four-man box zone formation, with one defender playing your best player man-to-man (see Junk Defenses). It is more commonly used when the star player is a perimeter player, as there are other ways to double-team a star post player.
Like attacking any zone defense, look for the gaps in the zone and penetrate those areas. Get the zone out of position with good quick passing, keeping the wings wide, using skip passes and dribble penetration. See Zone Offense to review the principles of zone offense. Your other four players have to step up and look for their shot.
You don't have to do anything fancy. Just setting good screens (e.g. flare-screens and dribble hand-off screens) for your star player is effective. This is simple and can create confusion on the part of the defense. The defender guarding your star player when screened calls for help or a switch, and his teammate (who is playing zone) may be confused on whether to go with the man, or stay in his zone.
And the defender playing man-to-man on the star, may get confused and not take the correct spot in the zone. So simple screens can confuse the defense, and maintains your star player as a vital part of the offense.
Another effective tactic is for your star player to screen and then seal the screened defender and roll to the hoop or pop to an open spot for the pass (see Setting and Using Screens).
Another strategy is to put your star player in either corner, running the baseline, always on the ball-side. This forces the defense to play what looks like a 2-3 zone. Now just use your usual 2-3 zone offense (see Attacking the 2-3 Zone).
Also see the "Big-Blocker" Offense for attacking junk defenses, including not only the "box-and-1", but also the "triangle-and-2", the "1-3 and a chaser", and the "diamond-and-1" defenses.
There are a number of ways of attacking the box and 1, depending on whether your star player is a guard or post player. Let's look at a few simple actions.
On this page:
- Your star player is your shooting guard
- Flare-screen for your shooter
- Dribble Hand-off (weave-screen) for your shooter
- Your star player is a post player
- Your star runs the baseline
Your star player is your shooting guard (O2)
Using a 3-out 2-in offensive formation, put your star player on the right wing so that his/her defender is out of the way too. The "box" is vulnerable in the middle. O3 slides down to the corner, or short corner area. O5 cuts to middle of the box and receives the pass from O1. If open, O5 can turn and shoot the short shot, or pass to O3 cutting back-door if the X5 defender comes up to defend the middle (diagram B).


Instead, if the X4 defender comes up to defend the middle, then O5 passes to O4 inside (diagram C). If the defender guarding your star player recognizes this and drops down to help defend against O4, then O5 passes outside to your star player for the outside shot. These decisions and passes must all happen quickly so that O5 does not pick up the 3-second lane violation. Emphasize in practice that O5 must quickly make the decision to either shoot or pass.
We have also found that using our "Zone-2 Runner" offense (with our post players setting baseline screens for O2) quite effective. O2 usually gets open in the corners, and O4 or O5 get open shots in the middle of the box.
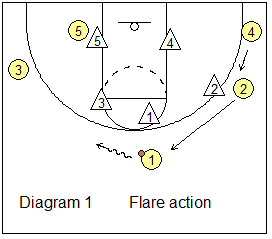
Flare-screen for your shooter
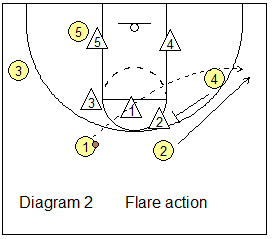
Use a perimeter flare screen to get your star shooter open for a 3-pointer. In diagram 1, the defense is in the box with man-to-man on your star (O2). O1 dribbles a little to the left as O2 comes up high, up to the lane line extended. It's very important that O2 gets high so there will be spacing for the flare cut.O4 comes up and sets a flare-screen for your star O2 (diagram 2). The screener O4 has to set the screen as high as possible, and O2 has to wait for the screen to be set. O2 cuts hard to the open wing for the two-handed overhead skip-pass from O1, and the 3-point shot.
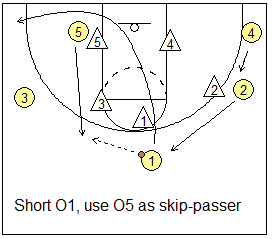
If your point guard is small and has difficulty skip-passing over the defense, instead have O5 or O3 cut to that top left point-wing area for a pass from O1. O1 then just cuts thru and out to the left corner. Sometimes it's easier for a taller post player to make that skip-pass.
Dribble Hand-off (weave-screen) for your shooter
Use a simple dribble hand-off to get your star O2 open. In diagram 3, O2 starts in the left corner. O1 passes to O3 and O1 fades to the right wing. O3 dribbles at O2 for a dribble hand-off/screen. Note that O4 back-screens X1, maintaining inside position and sealing.If O2's defender overplays and denies the hand-off (diagram 4), O2 reads this and cuts back-door for a pass and a mid-range corner shot. If X5 comes out to defend, O4 dives inside for a pass from O2.
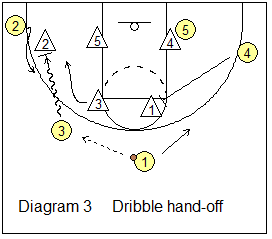
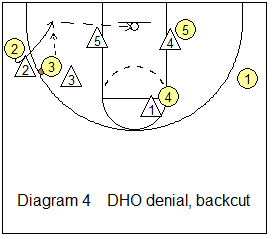
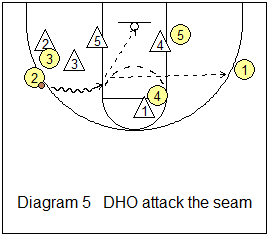
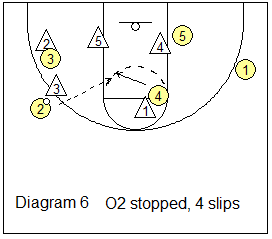
Diagram 5 shows O2 gets the hand-off and attacks the seam for a shot, or a kick-out pass to O1 for a shot. If the defense stops O2 outside (diagram 6), O4 reads this and slips for a pass from O2 and a shot.
I believe that you could use dribble hand-off actions anywhere on the perimeter to get O2 the ball, and then let him/her create.
Your star player is a post player.
Use a 1-3-1 offense, with your star player running the baseline. In this particular play, your star player once again is a decoy, playing below the low defenders in the zone, off in the weak-side corner. Your point guard O1 starts the play by making the pass to O2. O1 then shallow-cuts to the ball-side short corner area. O2 makes the pass to O4 in the middle of the 1-3-1 offense at the high post.


If O4 is a good shooter, he/she can beat this defense with a few shots from this area (diagram B). If the O4 defender comes up to defend the high post, then your O4 dumps the pass down to O1 in the short corner, who should be open for the shot, or lay-up (diagram C).
Although not shown in the diagrams, instead of having their X4 defender come up to defend the high post, the defense might have their X3 defender come up to defend the high post. In this situation, teach O3 to cut down to the weak-side low block any time he/she sees the X3 defender moving up to the high post area. Meanwhile, your star moves way out to the corner or wing areas to take his/her defender out of the picture. Now O3 is open on the weak-side low block for the pass and lay-up.
"21"
Put your star player at the weakside elbow. O1 dribbles toward X2 to engage X2. O2 screens X2 and O1 dribbles around the screen for the open 10-12 foot pull-up jumper. If X3 comes up to defend O1, O1 passes to O3 down low who is open for a lay-up. You could also run this to the left and call it "51".


Your star runs the baseline.
Here is another offense you can run, albeit a little more complicated, requiring some practice time. Have your star player run the baseline (diagram A). Set your wings O2 and O3 wide at the three-point line extended, 3-point arc areas. Set your low post O5 on the low block, same side as the star in the corner.The point guard O1 dribbles toward the wing opposite the star and passes to that wing. Meanwhile, O5 sets a back-screen for the star, who cuts around the backscreen, under the two low defenders to the corner or short corner. O5 the seals and rolls off the screen to the middle of the paint. Both the star and O5 are looking for the pass and opportunity to score. O2 rotates a little toward the top of the key.


If nothing develops (diagram B), O3 cuts to elbow paint area looking for a pass, and then moves out to the opposite wing. O2 rotates out to the point. O1 waits for O3's cut and then cuts hard to just inside the free throw line, looking for the pass, and immediately cuts out to the ball-side wing if the pass in the paint is not there.
The ball is reversed from the corner to the wing and to the point (diagram C). The point now starts the same play, going to the opposite direction.
Using a 1-3-1 set with your star running the baseline.
Use a 1-3-1 set (diagram A). Your star runs the baseline, always on the ball-side. You can see that if you put a good offensive player in the middle at the O4 position, he/she can get a lot of scoring chances. Pass the ball to either wing. O4 moves to the ball-side elbow looking for the pass from the wing, and then immediate dribble-penetration to the middle of the paint for the short pull-up jumper.

Your point guard is your star.
Try this 1-4 low stack if your point guard O1 is your star. Put your best outside shooters in each corner. O1 can dribble either right or left, and then pass to the open shooter in the corner (either O2 or O3). It the low defender comes out, pass inside to the O4 (or O5 if on the left side). If the top defenders (X2 and X3) start to drop into the corners, then you have a simple 1-on-1 clear-out for your star O1.
Some set plays will work. See "91". O4 back-screens for O1, and this gets O1 an open 3-point shot from the wing.
Related pages:
Want More Coaching Content?
Get access to more complete articles, diagrams, and coaching tools with Premium Membership.
View Membership Options