From the Coach's Clipboard Basketball Playbook
Disclosure: This page contains affiliate links, which means that Coach's Clipboard receives a small commission (at no cost to you) if you make a purchase using these links.
Z-Drill
This drill stresses proper defensive footwork, slides and sprints. Coaches often encourage their defenders "move your feet, don't reach in!", and this drill emphasizes that.Set-up:
See the diagram. Place cones or balls at the specified places on the court (top of the key, on each end, and each mid-court sideline). Form a single line at the corner of the baseline. The first player in line turns around and faces the baseline.
The Drill:
First Option: Defensive sliding the whole way.
The first player in line starts the drill facing the baseline and slides to the first cone at the top of the arc, using proper stance and sliding technique (see Basic Defense). Upon reaching the cone, he/she pivots off the lead foot and slides to the next cone at half-court sideline.
Then the player continues pivoting and sliding to the next cone at the top of the far end arc, and then to the baseline corner. After reaching the corner, he/she sprints along the baseline to the other corner, and zig-zags back up the court.
The second player in line starts after the preceding person reaches the first cone. Have all players do this, watching and stopping to demonstrate correct stance, footwork, and slides. Be careful not to over do this drill at first, as players can become very tired doing this drill.
Second Option: alternate defensive slides and sprints.
Do the drill the same way, with the player sliding to the first cone. After reaching the first cone, have the player pivot and sprint (as though he/she were beaten) to the half court sideline cone, and seal the sideline off. Then resume sliding to the next cone, and then sprint again. Alternate slide and sprint every other cone.

Third Option: go man-to-man defense against an offensive player.
The drill is the same except now you add a ball-handler. The offensive player dribbles to each cone while the defender slides and stays in front of him/her. You can have the offensive players start out at a slower speed at first, and eventually work up to full speed, to see if the defender can stay with him/her.
If the defender gets beat, he/she must turn and sprint after the offensive player, and get back into proper sliding position. After reaching the far baseline, rotate the offensive players to defense, and vice-versa, and return up the court.
Defensive Lane Slides
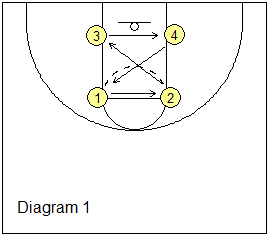
These basic drills work on footwork and conditioning. The defensive slide is a critical skill for on-ball defense and stopping dribble-penetration. Defenders must be able to quickly move laterally and maintain correct defensive position to stop the dribble. Quick lateral movement is also key in giving help (help and recover, helpside).Slide #1
Break the team up into small groups and use all of the court's key areas. The object is to complete as many laps as possible within one minute. All "laps" start and end at the #1 position, with the player facing away from the basket (in a defensive position).Running the drill: Starting at the O1 spot, the player slides left to the opposite elbow #2 spot, then retreats diagonally dropping the right foot sliding to the opposite block O3 spot, then slides laterally to the opposite block O4 spot, and finally slides back up diagonally to the original O1 spot and slaps the floor, calling out the number of that lap he/she has just completed. Repeat this sequence for one minute.
Pointers: players must maintain a proper stance, and must not sacrifice correct technique for speed. The key positioning tips are:
- Stay low.
- Stay wide.
- Thighs are locked and loaded, ready to move any direction.
- Weight is on the balls of the feet.
- The upper body should lean slightly forward with the chin directly above the knees.
- Hands should be away from body (wider than knees), with palms facing up toward the ball.
Tired players, in addition to slowing down, usually either stand up too much or lean too far forward. If you do this every day, their strength and stamina will improve and players will be able increase their number of good laps.
Optionally, you can do this drill going in the opposite direction, starting on the right elbow (instead of the left), with lateral slides going to the right.
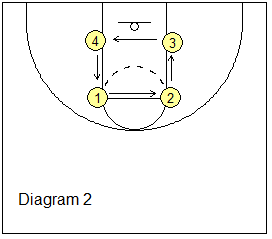
Slide #2
All the rules are the same as the previous slide drill #1, but the route is different (see diagram 2).Running the drill: Starting at the O1 spot, the player slides to the opposite elbow #2 spot, then back-pedals to the same side block O3 spot and slaps the floor, then slides laterally to the opposite block O4 spot, and finally sprints back up to the original O1 elbow spot and slaps the floor, calling out the number of that lap he/she has just completed. Repeat this sequence for one minute.
Pointers... stay low, even when back-pedaling and sprinting forward. When retreating, drop the outside foot backward and push off with the front foot.
Optionally, you can also do this drill going in the opposite direction, starting at the right elbow (instead of the left).
Want More Coaching Content?
Get access to more complete articles, diagrams, and coaching tools with Premium Membership.
View Membership Options