From the Coach's Clipboard Basketball Playbook
This is the second article in the SOS defense series. A previous article presented an overview of Bob Kloppenburg's SOS pressure defense. This page takes a more detailed look at the SOS half-court defense, with comparisons to man-to-man pressure defense (Dick Bennett style).
Bob was a great high school and college player years ago, and became a high school coach. He went on to coach very successfully at the college level for 22 years at Cal Western, with a tremendous winning record and a number of trips to the NAIA national tournament. He has coached at the professional level with the Seattle Supersonics, and also with the Rockets, Nuggets, Raptors, Bobcats, and Clippers.
Bob has developed and tweaked his SOS defense for over 50 years. His SOS Defense has been used by high school and college teams around the world. In the USA, he has conducted over 20 SOS clinics, as well as clinics for basketball federations in 14 other countries.
"Bob Kloppenburg is a defensive genius." - Pat Riley, NBA Coach Retired

Bob Kloppenburg
On this page:
Overview
Here we will discuss details of the SOS half-court defense. Any coach or player who wants to learn more and implement the SOS system will definitely want to purchase Coach Kloppenburg's DVDs, books or ebook (see below). I'm also going to compare it to our pressure man-to-man defense.The SOS Pressure Defensive system has been used from the NBA level down to the junior high level. It is a man-to-man pressure defense but with weakside, zone-like principles. It is based on the concept of total disruption and forces the offense to react to it, rather than vice-versa. You can get turnovers and can generate a lot of "offense off defense" with the SOS. It is predicated on 12 basic rules.
Teaching the SOS Defense
The SOS defense, in its entirety is both a half-court and a full-court defensive system. Coach Kloppenburg advises teaching the half-court system first, and once that is mastered, put in the full-court and transition aspects. This article will just discuss the half-court principles. Also see Full-Court SOS defense.The DVDs present an overview of the system and rules first, but the real teaching comes from the drills, as players must have sound defensive fundamentals. Players must learn how to play with intense pressure on the ball, and tight denial (one pass away).
After presenting an overview of the defense, Coach Kloppenburg goes through all of the necessary drills... the mass drill, 1-on-1, 2-on-2, 3-on-3, and 4-on-4 drills. The "snuggle denial", "sequence", and "sprint-recovery" drills are included. Several "combo" drills are presented combining elements of the 1-on-1 and 2-on-2 drills into one drill. The drills are on the DVDs, and are not presented here... so be sure to get the DVDs.
The 12 Rules of the SOS System
Rule #1 - On-ball defense
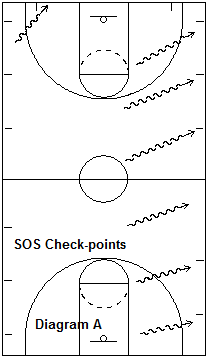
It all starts with tight pressure on the ball. This is common to all pressure defenses. Coach calls it "set on and smother", with forcing the ball to the sideline (check-points - diagram A).The on-ball defender's outside foot and hand are back while the inside hand gets into the player's mid-section and the defender's nose is at the offensive player's chest level. Hands mirror the ball... when the ball is up (or dead), the defender moves right up with hands up in the "smother" position.
When defending on-ball on the wing, deny the middle dribble and force baseline. The defender's top foot is 2 inches above the offensive player and the defender uses quick 3 inch slides.
Rule #2 - Force Everything to the Box (Sideline) Area
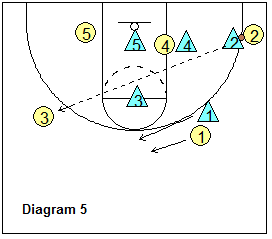
Forcing to the sidelines is somewhat similar to the Dick Bennett style pressure man defense with forcing sideline and baseline, but the SOS extends it even more to those check-points seen in diagram A. Keep the ball on one side in the box area (diagram 3), allowing cross-court skip-passes only (diagram 5). There are opportunities for trapping here.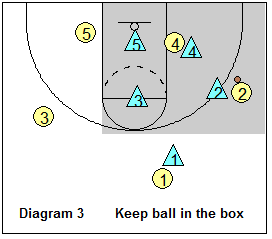
Rule #3 - First Pass Denial
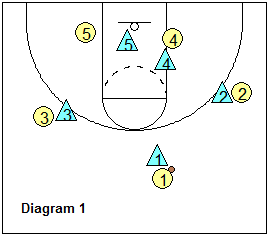
Similar to the Bennett-style, the pass to players one pass away is denied (diagram 1). The SOS however is more intense here, using what Coach Kloppenburg the "snuggle" position. X2 and X3 are in a very tight denial, "snuggle" position on O2 and O3.The "snuggle" position is nicely demonstrated on the DVDs. The defender gets low with his/her nose at the offensive player's chest. The back, outside foot is 12 inches behind the offensive player's foot (so as to not get beaten by a back-cut). The inside arm and hand are extended into the passing lane, palm facing the ball.
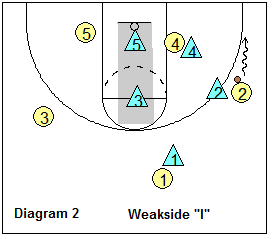
Rule #4 - 2 Passes Away - Weakside "I" Positioning
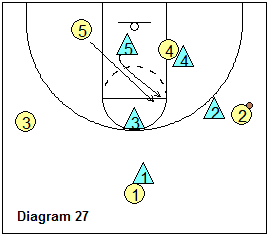
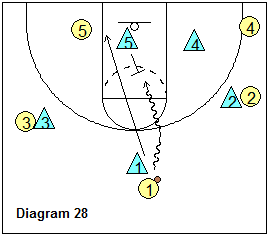
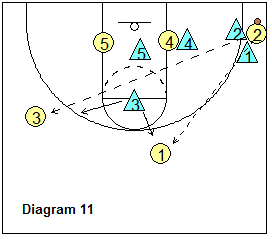
When the ball is on the wing (diagram 2), the ball is pressured toward the corner by X2. Do not allow middle dribble-penetration ("no middle"). The pass back out is snuggle-denied by X1, and the low post (on the block) is full-fronted by X4 (full-fronting the low post is different from the Bennett-style, which usually uses a 3/4 front). The two weakside defenders are in the weakside "I", or "strike", position, with X5 in the "low-I" position and X3 in the "high-I" spot. The high-I and low-I positions are also referred to as "strike" positions. This is similar to the "helpside" positioning in the Bennett-style pressure defense.The "low-I" defender protects the basket, defends against the low post lob pass, and rotates to the low post full-front, denial position on the baseline dribble (or on "Base Go Red" below). He/she also denies the cut up to the high post (diagram 27), and stops dribble-penetration (diagram 28) when the perimeter player gets beaten off the dribble. Notice here that the beaten perimeter player does not "give up", but pursues and sprints to the low post player X5, hoping to either deny that pass, or defend the post player X5.
The "high-I" defender closes-out on the first pass back out to the top, and denies wing cutters.
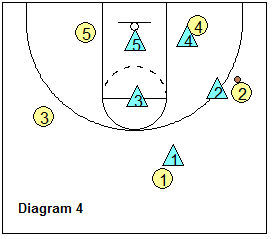
One other point on low post defense... notice in diagram 4 that when the offensive post player is not actually on the block, but outside or in the short corner, we do not full-front, but instead 3/4 front from the top.
Rule #5 - Drive Inside the Box - Trap and Rotate
In diagram 6, X3 forces the dribble to the baseline check-point. Here the ball is stopped with a hard trap from both X3 and X5. X4, X2 and X1 immediately rotate as seen in diagram 6, resulting in the positions seen in diagram 7. Notice that whenever we trap, there is "triangle-I" defending the paint area. Coach Kloppenburg calls this "Base Go I - In".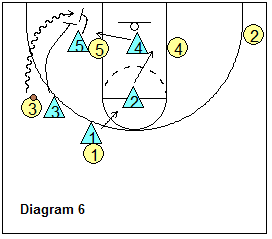
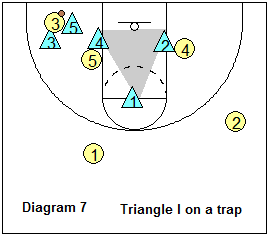
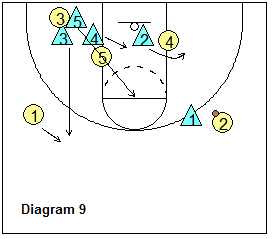
Diagram 8 shows the pass out of the trap. The high-I defender X1 takes that pass, as he/she is nearest to the ball (another one of the rules below). Diagram 9 shows the rotation on the skip-pass to O2. X1 pressures O2 while O3 sprints up to "snuggle" (deny) O1. X2 full-fronts O4. X4 moves to the low-I spot and X5 to the high-I spot.

Rule #6 - Drive Outside the Box (no penetration) - Strongside Denial and Weakside I Packed Inside
Next, diagram 10 shows O2 attempting a drive, but it is forced to the corner by X1. Depending on your team's quickness, you can either have X2 full-front the pass into the low post, with X4 at the low-I and X5 at the high-I. Coach Kloppenburg calls this "Base Go I - Out". Or you can trap the corner with X2 and X1 (diagram 11). X4 full-fronts the low post, X5 drops to the low-I spot and X3 moves to the high-I spot. X3 would take the skip-pass out of the trap.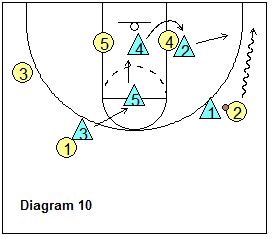
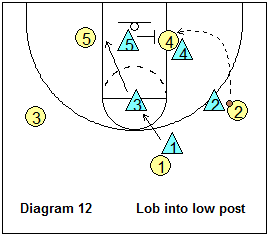
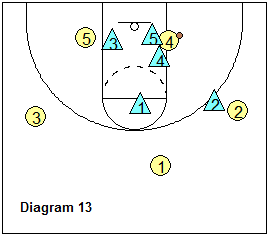
Defending the lob pass into the low post. This is a difficult pass, which is made even more difficult by smother defending on the ball. Diagram 12 shows the lob pass defense. X5 (in the low-I spot) immediately doubles this, while X3 (high-I) rotates down and X1 moves to the high-I spot, resulting in the positioning seen in diagram 13. X2 denies the pass back out to O2.
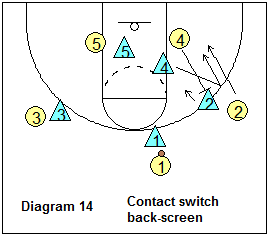
Rule #7 - Contact Switch all Screens
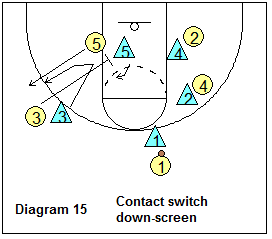
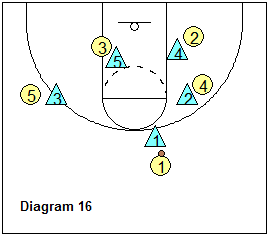
Unlike the Bennett-system, the SOS system "contact" switches all screens. These contact switches are not lazy switches (like we see in pickup games). Contact switches are aggressive switches with player contact, with the defenders ending up in the passing lanes, denying a pass to either player. Here are typical examples: Back-screen (diagram 14) - on O4's back-screen, X4 takes O2, while X2 takes O4. Defenders get in the passing lanes with contact on the offensive players.Down-screen (diagram 15) - on O3's down-screen, X5 takes O3, while X3 bumps and goes with O5, resulting in the positioning (both sides) seen in diagram 16.
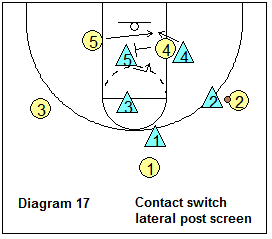
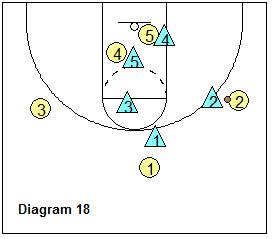
Lateral Post Screens (diagrams 17 and 18) - O4 screens away for O5. Again, we contact switch with X4 bumping and denying O5, and X5 stepping over and around the screener O4.
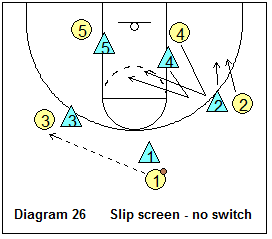
What if the screener "slips" the screen? There is no switch here since in effect there is no screen (diagram 26). Communicate!
Rule #8 - Sideline Screen and Roll - Below the Free-Throw Line - Automatic Trap
If the offense runs a screen and roll below the free-throw line, automatically double team this. Diagram 19 shows this and the rotation away from the ball.
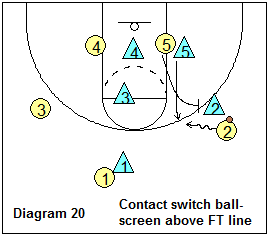
Rule #9 - Sideline Screen and Roll - Above the Free-Throw Line - Contact Switch
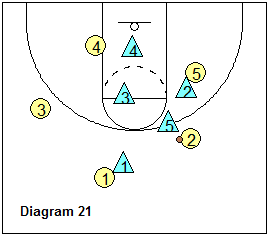
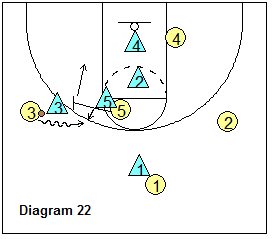
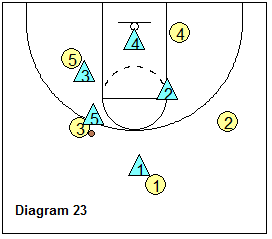
If the offense runs the screen and roll above the free-throw line, contact switch this. Diagram 20 shows how X5 switches, takes the ball and is in good position to defend either the outside shot or the dribble-drive. X2 steps over the screen with contact denying the passing lane to O5 (diagram 21).Diagrams 22 and 23 show another example of the high ball-screen coming from the high post. X3 and X5 contact switch the screen. X5 stops the ball, while X3 denies the roll pass.
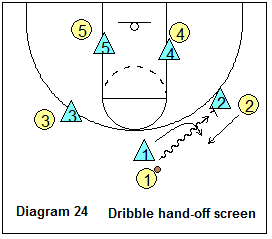
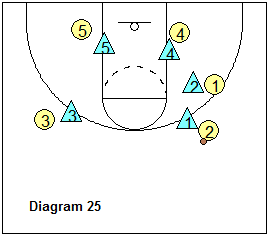
Diagrams 24 and 25 show the weave-screen (dribble hand-off) ball-screen. Again, contact switch this.
Rule #10 - Ball in the Corner - Trap and Rotate
In diagram 10B, the ball is dribbled to the corner. X4 sprints out and traps with X2. X5 rotates to full-front the low post, while X3 and X1 move to the low-I and high I spots, and we have our "triangle-I" inside (diagram 11B).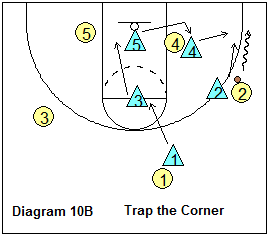

Rule #11 - Near Man Concept
In diagram 11B, if the ball is passed out to either O3 or O1, X1 closes-out on the ball, as the player nearest to the ball takes the ball - the near man concept. Whenever there is a question as to who takes the ball, it's the nearest man.Rule #12 - Everything Stays on One Side of the Court
This has already been discussed above. Keep the ball on one side of the court (similar to the Bennett-style defense). When the ball is on the wing, the on-ball defender forces toward the baseline, and denies middle dribble-penetration.The pass allowed is the cross-court skip-pass. The nearest defender (usually the high-I) closes-out on this with high hands. Defenders rotate as soon as the pass leaves the passer's hands, and we set up the defense on the opposite side, with all the same rules.
A few more pointers...
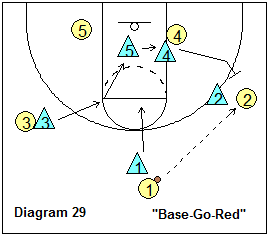
Base Go Red
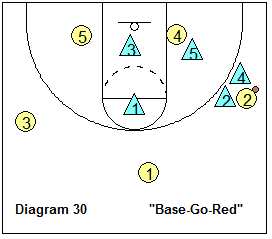
"Base Go Red" refers to aggressively trapping the wing. Teams with quickness can get turnovers here, and points off the turnover. If your team is not quick, use the standard "Base Go I" (In and Out) described above.This is similar to our Bennett-style "Side Fist", except that "Side-Fist" traps just the first pass to the wing, whereas "Base Go Red" traps every pass to the wing, on either side. Diagram 29 shows an immediate trap when the ball is passed to the wing O2. X4 sprints out and traps with X2. X5 denies the low post pass, while X3 drops to the low-I position and X1 gets the high-I position (diagram 30). Notice that we again have the "triangle-I" away from the ball.
Trapping the Short Corner
Ordinarily the pass to the short-corner would be denied with the post defender in a 3/4 front (from the top) position (diagram 31). But there will be times when the ball does get into the short corner. Trap this, with the same rotations used for baseline dribble-penetration. X4 sprints out to trap (diagram 32), while X3 drops to the low-I strike position, and X1 moves to the high-I spot. X2 snuggle denies the pass back out to the wing.

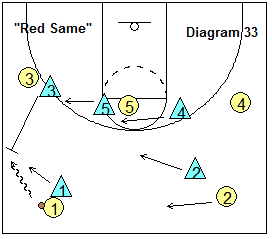
Red Same
"Red Same" refers to a quick trap on the point guard just inside the half-court line. We might want to take the ball out of the talented point guard's hands. Or we might want to run this as a surprise tactic a few times during the game, maybe after a time-out. This is similar to our Bennett-style "Red".Diagram 33 shows X1 forcing O1 to a sideline. The wing defender (here X3) immediately sprints up and traps O1 with X1. X5 rotates to snuggle deny the pass to that wing, while X4 denies the high post pass, and X2 drops to a high-I position.
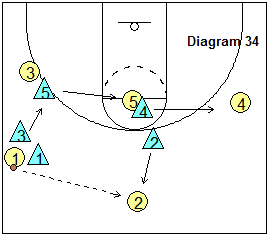
The pass out of the trap usually goes to O2 (diagram 34). The nearest defender X2 closes-out on the ball, while X1 snuggle denies the pass back to O1. X3, X4 and X5 rotate as seen in the diagram. If the pass goes from O2 to O4 on the opposite wing, this is a good time to trap the wing with "Base Go Red".
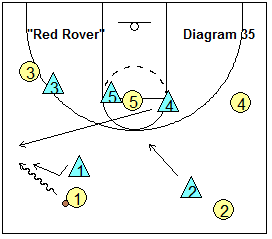
Red Rover
"Red Rover" is the same as "Red Same" except we pre-designate our trapper (instead of the wing defender coming up to trap). You might have a very quick, athletic player who likes to trap and "get after it"... so he/she becomes the "red rover", and can go trap whenever. It gives you another look. Diagram 35 shows that X4 is our "red rover", and traps O1 with X1 on the sideline. X3 and X5 are in snuggle deny, while X2 drops to a very high-I position. Use the "Base Go Red" trap when the ball goes to the wing.See this article "Save our Sonics defense", which includes many video clips of the SOS defense. The SOS defense was integral in the success of the Seattle Supersonics in the late 80's and 90's when Bob Kloppenburg was an assistant.
Related pages:
Disclosure: This page contains affiliate links, which means that Coach's Clipboard receives a small commission (at no cost to you) if you make a purchase using these links.
Bob Kloppenburg's SOS Book and DVDs:
If you like the SOS defensive system, I recommend your purchasing the DVDs and book. The DVDs present the whole system very clearly and include demonstrations and descriptions of all the necessary, important drills, as well as on-court demonstrations... Coach Gels
SOS Pressure Defense - 4th Edition, paperback, by Bob Kloppenburg
The Encyclopedia of the "SOS" Defensive System
Advanced SOS Defensive System
Want More Coaching Content?
Get access to more complete articles, diagrams, and coaching tools with Premium Membership.
View Membership Options