From the Coach's Clipboard Basketball Playbook
This is the third article in the SOS defense series. Previous articles included An Overview of Bob Kloppenburg's SOS Pressure Defense and SOS Half-Court Defense and Rules. This article will now focus on SOS transition and full-court defense. These things and much more (including all the necessary drills) are all covered in the excellent DVDs, ebook and hard copy book, which I highly recommend.
Bob was a great high school and college player years ago, and became a high school coach. He went on to coach very successfully at the college level for 22 years at Cal Western, with a tremendous winning record and a number of trips to the NAIA national tournament. He has coached at the professional level with the Seattle Supersonics, and also with the Rockets, Nuggets, Raptors, Bobcats, and Clippers.
Bob has developed and tweaked his SOS defense for over 50 years. His SOS Defense has been used by high school and college teams around the world. In the USA, he has conducted over 20 SOS clinics, as well as clinics for basketball federations in 14 other countries.
"Bob Kloppenburg is a defensive genius." - Pat Riley, NBA Coach Retired

Bob Kloppenburg
Teaching the SOS Defense - Half Court First!
The SOS defense, in it's entirety is both a half-court and a full-court defensive system. Coach Kloppenburg advises teaching the SOS half-court defense first, and once it is mastered, put in the full-court and transition aspects.SOS transition and full-court defense uses all the same basic SOS principles presented in the half-court article, just extended to the full-court. So it's fairly easy to learn once you understand the half-court system.
On this page:
SOS Transition Defense
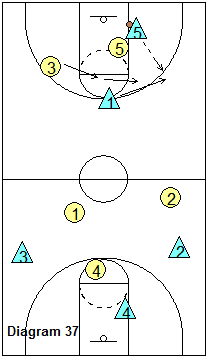
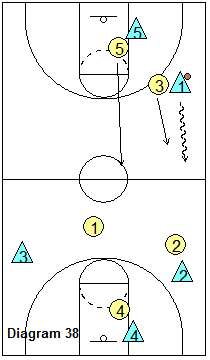
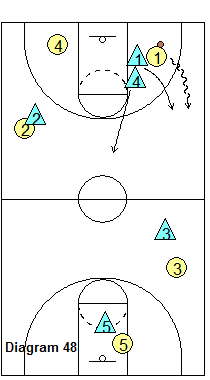
The principles of SOS transition defense are summarized by the phrase "smother - find - release". When the opponent rebounds our missed shot, the SOS defense starts immediately. Our defender nearest the rebounder "smothers" the rebounder with hands up high, making the outlet pass more difficult. In diagram 36, X5 smothers the rebounder O5. In these next three diagrams, our team is in the yellow circles.Meanwhile, our defender closest to the opponent's point guard (here X3), immediately finds and picks up the point guard and tries to deny or delay the outlet pass. Once the outlet pass is made however to the point guard O1, our defender pressures and tries to force the ball up the sideline. In diagrams 36, 37, and 38, X3 finds O1, and pressures O1 up the sideline.
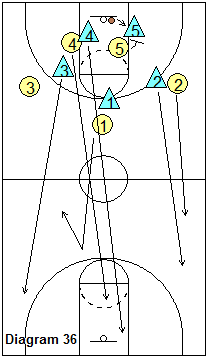
Our top, outside guard X1 drops back initially as our safety, not allowing anything to go long... but when X4 and X2 arrive, he/she goes back up to about half court. Our other defenders X2 and X4 release down the floor, denying the long pass.
We may not get any traps or steals in the back-court. But if we hit the offense with a quick "Base Go Red" (sideline trap) or "Red Same" or "Red Rover" just beyond half-court, turnovers can be forced at that point. This is because often the offense relaxes and feels that they have beaten the press once the ball gets over the half-court line.
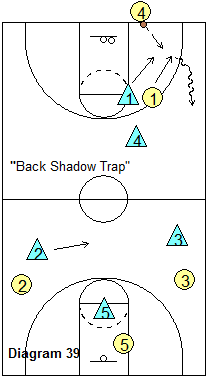
"Back Shadow Trap"
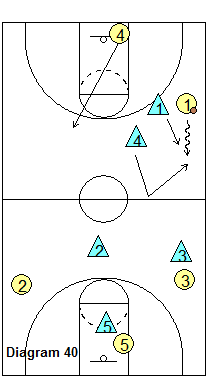
This is a full-court defense employed after a score, or whenever the opponent has to inbound the ball. See diagram 39. X2, X3 and X5 go deep with their man, positioning themselves about 12 feet above the offensive player (close enough to be able to intercept the long pass). With any of the deep defenders, if his/her man cuts up toward the ball, the defender bumps and denies this pass.X1 defends O1, and forces O1 up the sideline. This allows X2 to move to the middle "high-I" position. You will also notice (diagrams 40 and 41) that when the ball goes up the sideline, we have a "triangle-I" with X2 at the high-I, X5 at the low-I, and X3 denying the pass up the sideline.
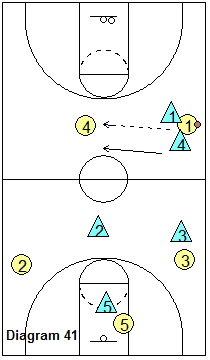
Notice that X4 starts out high, beyond the 3-point arc. X4 stays above the ball, and then times a trap up the sideline with X1 (diagram 40).
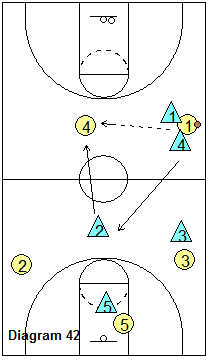
If the pass out of the trap goes from O1 to O4, if possible, X4 will sprint out of the trap and close out on the ball O4 (diagram 41). If X4 can't get there, X2 comes up and stops the ball (diagram 42), while O4 sprints to the very high-I strike position.
Again, once the ball advances over the half-court line, look to use the "Base Go Red" sideline trap.
"Back Shadow Hold"
This is the same exact defense as "Back Shadow Trap" except that here O4 just fakes the sideline trap, and "holds" in the middle I position. We will try to sideline trap O1 beyond half-court - "Base Go Red"."Up Shadow Trap"
"Up Shadow Trap" is similar to "Back Shadow Trap" except that here we start X4 on the ball in the smother position (diagram 43). Once the pass gets in to O1, X4 sprints above the ball, looking for a good moment to trap with X1 on the sideline.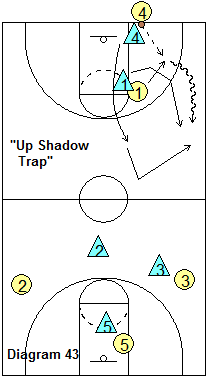
"Up Shadow Hold"
This is just like "Up Shadow Trap" but with X4 just faking the sideline trap (as in "Back Shadow Hold"). Once again, we look to trap along the sideline once the ball gets over half-court."Face Shadow Trap"
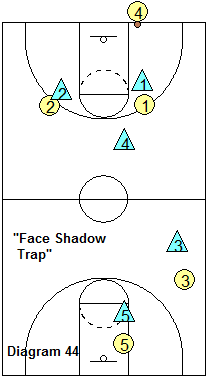
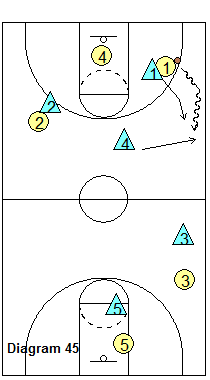
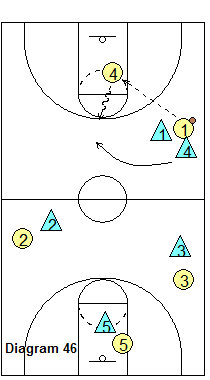
Coach Kloppenburg might use this after a made free-throw. This is a full-out denial defense with X4 above the arc (diagram 44). This allows X1 and X2 to smother deny their players, not worrying about the over the top lob pass, as X4 will intercept the lob pass.If the ball gets inbounds, it is forced up the sideline (diagram 45). X4 sprints over to close the sideline trap. The pass out of the trap will probably go to O4 (diagram 46), and X4 sprints out of the trap to pressure O4 and the ball.
"Lock Shadow Trap"
Coach Kloppenburg might use this after a made basket and when we want to take the ball out of the point guard's hands. See diagram 47. X1 and X4 double-deny O1, while X2 denies O2. Again, if O1 does get the pass, X1 forces O1 up the sideline. X4 sprints above the ball, looking for the sideline trap.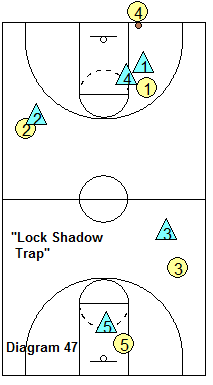
With all of these full-court defenses, use the "Base Go Red" sideline trap if you have a quick team. If not, just use the standard SOS "Base Go I". For completeness, we will now review the "over half-court" sideline traps.
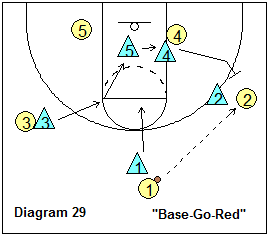
Base Go Red
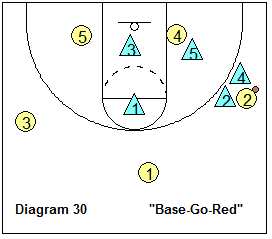
"Base Go Red" refers to aggressively trapping the wing. Teams with quickness can get turnovers here, and points off the turnover. If your team is not quick, use the standard "Base Go I" (In and Out) described above.Diagram 29 shows an immediate trap when the ball is passed to the wing O2. X4 sprints out and traps with X2. X5 denies the low post pass, while X3 drops to the low-I position and X1 gets the high-I position (diagram 30). Notice that we again have the "triangle-I" away from the ball.
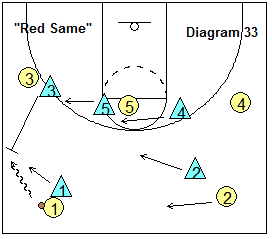
Red Same
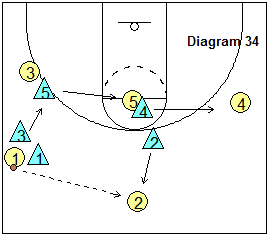
"Red Same" refers to a quick trap on the point guard just beyond the half-court line. We might want to take the ball out of the talented point guard's hands. Or we might want to run this as a surprise tactic a few times during the game.Diagram 33 shows X1 forcing O1 to a sideline. The wing defender (here X3) immediately sprints up and traps O1 with X1. X5 rotates to snuggle deny the pass to that wing, while X4 denies the high post pass, and X2 drops to a high-I position.
The pass out of the trap will usually go to O2 (diagram 34). The nearest defender X2 closes-out on the ball, while X1 snuggle denies the pass back to O1. X3, X4 and X5 rotate as seen in the diagram. If the pass goes from O2 to O4 on the opposite wing, this is a good time to trap the wing with "Base Go Red".
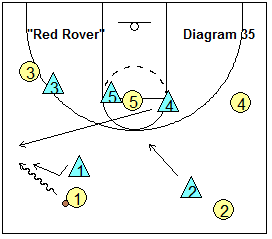
Red Rover
"Red Rover" is the same as "Red Same" except we pre-designate our trapper (instead of the wing defender coming up to trap). You might have a very quick, athletic player who likes to trap and "get after it"... so he/she becomes the "red rover", and can go trap whenever. It gives you another look. Diagram 35 shows that X4 is our "red rover", and traps O1 with X1 on the sideline. X3 and X5 are in snuggle deny, while X2 drops to a very high-I position. Use the "Base Go Red" trap when the ball goes to the wing.See this article "Save our Sonics defense", which includes many video clips of the SOS defense. The SOS defense was integral in the success of the Seattle Supersonics in the late 80's and 90's when Bob Kloppenburg was an assistant.
Related pages:
Disclosure: This page contains affiliate links, which means that Coach's Clipboard receives a small commission (at no cost to you) if you make a purchase using these links.
Bob Kloppenburg's SOS Book and DVDs:
If you like the SOS defensive system, I recommend your purchasing the DVDs and book. The DVDs present the whole system very clearly and include demonstrations and descriptions of all the necessary, important drills, as well as on-court demonstrations... Coach Gels
SOS Pressure Defense - 4th Edition, paperback, by Bob Kloppenburg
The Encyclopedia of the "SOS" Defensive System
Advanced SOS Defensive System
Want More Coaching Content?
Get access to more complete articles, diagrams, and coaching tools with Premium Membership.
View Membership Options