Seam - Off the Secondary Break
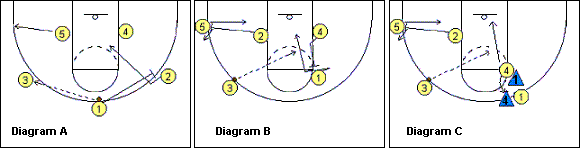
Versus man-to-man defenses, first, (except when fast-breaking) we always come up the floor in our secondary "numbered" break. Our point guard O1 is always the first option in that break. So every trip up the floor, O1 is always looking for a chance to "take the seam" or dribble-penetrate the right top seam for a lay-up, or a pull-up jump-shot. We don't even have a name for this play, but always consider it as our first option every trip down the floor. But you could call it as a separate play.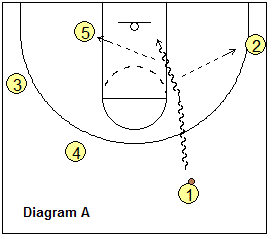
Notice how O2 is wide in the corner, and our posts are both on the left side, opening a large seam for O1 to take his/her defender 1-on-1. If the X2 defender drops inside, or the X5 defender comes up to defend, O1 can pass to O2 or O5 instead. A guard that penetrates the lane is a very difficult situation for the defense, and this also puts pressure on the inside defenders and exposes them to foul problems.
Notice that the set in the diagram is 4-out. We can run this as our first option even with a 3-out, 2-in set by having O4 initially high at the 3-point arc as above, waiting for O1 to dribble-drive. If O1 pulls up (does not drive), then O4 cuts through for a possible pass for O1 and then plays on the right low block (now we're in our 3-2 set).
3-Out 2-In "53"
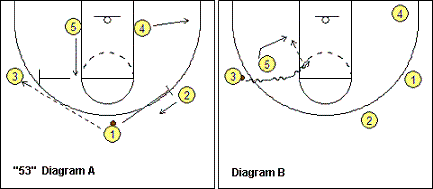
This simple pick and roll play between O5 and O3 is difficult to defend. See the diagrams below. O1 passes to O3. Meanwhile O5 slides up to the ballside elbow and then back-screens for O3. O3 dribbles around the top of the screen and O5 seals and rolls to the hoop. If defense fails to switch, O3 should get the lay-up. If the defense switches, O5 will usually get open for the pass and lay-up, or at least will have a "big-little" mismatch in the post.Notice that we have also cleared out our other players to weakside in hopes of taking their defenders away. O1 screens for O2 to make X1 and X2 think that something is going on over there. O2 stays a little to the right and does not come all the way up to the top (point). O4 moves out to the short corner. You can run this play to the right side too and call it "42".
3-Out 2-In "43"
This is a back-screen play designed to get the back-cutter open for a lay-up. In diagram A, O1 passes to O2. Meanwhile O5 screens for O4. O4 cuts around the screen and then screens for the opposite wing O3. After screening, O5 flashes to the high post for the pass from O2. O3 cuts around O4's back-screen for the pass from O5 (diagram B). Optionally, O5 can shoot, drive, or pass to O2 (now in the corner), or across to O4.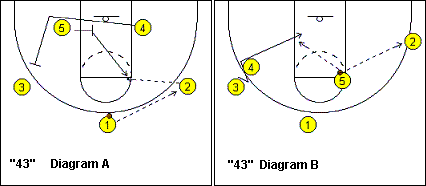
"Blue"
A simple play for youth teams, we run this out of the 3-out, 2-in set (but you also run it from the 4-Out set. In diagram A, O1 passes to O2, and O2 passes to O4 in the corner. O2 makes a lane cut and could get the pass from O4 for the lay-up (diagram B). If the pass is not there, O2 then screens for O5 (diagram C). O5 cuts to the ball-side block and gets the pass from O4. O1 and O3 rotate right one spot.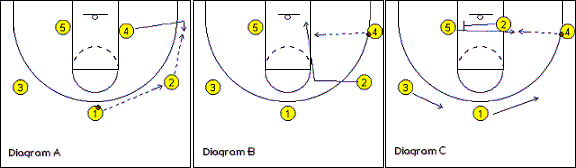
"Red"
A simple but effective play, we run this out of the 3-out, 2-in set, but you could also run it from the 4-Out set. O1 passes to O2 and makes a basket-cut, looking for the pass back from O2 (a simple "give and go"). If the pass is not there, O1 "chips" or bumps the X5 defender and O5 cuts around the screen, looking for the quick pass from either O2 or O4. After screening for O5, O1 moves to the opposite corner-wing and O3 rotates up top.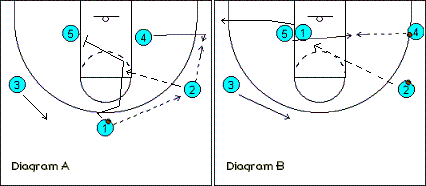
"3-2 Reverse"
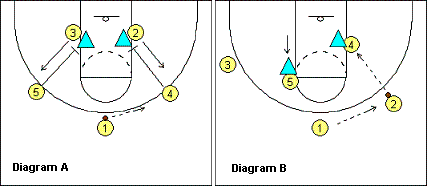
Do you have a good post player who can score in the low block, but he/she is not getting the ball often enough. Are you having difficulty getting the pass from the point guard to the wing? This simple play should help both. We use the 3-out, 2-in set. But in this play (diagram A), the low posts O4 and O5 start at the wing positions and O2 and O3 start at the low blocks... just the "reverse" of their normal positions. O4 and O5 set down-screens for O2 and O3, who cut hard to the wings looking for the pass from O1.As soon as O2 and O3 cut around the down-screens, O4 and O5 immediately pivot and seal the defender and post-up to receive the quick pass from the wing (diagram B). The passes from O1 to O2 and from O2 to O4 should be made without delay... like a "quick hitter". You can run this to either side... the point guard O1 can pass to to either O2 or O3. Once the post opposite the ball sees the pass going to the opposite wing, he/she moves to the elbow to take his/her defender up high (removing the helpside).
"WS2" & "WS3"
A simple weave-screen play is an effective way to set up your good outside shooter for a 3-pointer, or a for "take" into the paint. I am showing this play using a 3-out, 2-in set but you can run it from really any set, including the 4-out, 1-in motion offense or the 5-out open post motion offense.Another situation where this is helpful is when the wing defenders are doing a good job denying the pass to your good wing shooter. If you recognize this situation, you can call this play from the bench. With this play, you don't have to pass the ball to get it to the wing. It's just a simple, old-fashioned weave-type hand-off from the point guard to the wing player, with the point guard setting the screen.
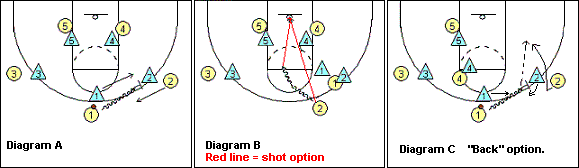
You can call the play whatever you want... "W2" (meaning the weave-screen play is going to O2). Call "W3" for the play to go to O3 instead. See the diagrams below. With "W2" the point guard dribbles over to O2, makes the handoff to O2, while screening off his/her defender. O2 comes around the screen, getting the hand-off and can pop out for the 3-point shot (this screen usually results in enough spacing for an open shot). Optionally, if the X1 defender plays up tight to deny the outside shot, O2 can beat the defender and make a move into the paint for a pull-up jumper.
"Back" Option
After running W2 or W3 a few times, teams start looking for it and X2 will try to come over the screen and jam the hand-off, while X1 will "jump-switch" the screen. The counter for this is the "Back" option. See diagram C above. With the back option, O2 fakes toward the ball, lets the defender come along and then suddenly back-cuts for the bounce pass and lay-up. Notice that we position O4 up at the weakside high post to clear O2's path to the basket. If the X5 defender slides over, O2 can pass to O5.Simple 3-2 Post Hi-Lo Motion
We want our post players working together. Here is some simple hi-lo post motion that you can run out of the 3-out, 2-in motion offense set.In diagram A, the ball-side post (O4) screens for the opposite post (O5). If the O5 goes low around the screen to the block, then the screener (O4) cuts up to the high post area (diagram B). The pass from the wing could go to either O4 or O5. If the pass goes to the high post (O4), O4 can either shoot or look down low to O5.
In diagram C, this time the cutter (O5) goes to the high post, so the screener (O4) goes to the low block. Again, the pass from the wing can go to either post player. It is essential that the screener reads the situation correctly. The screener’s cut is opposite of what the cutter does. If the cutter goes low, the screener goes high. If the cutter goes high, the screener goes low.
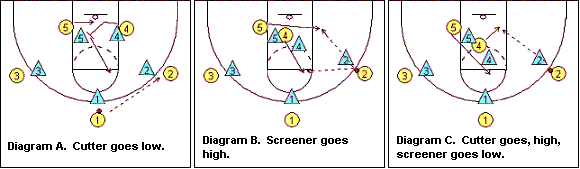
"High-2" and "High-3"
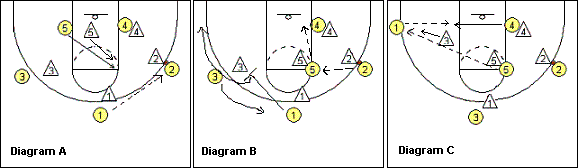
When the defense full-fronts your low post player... we run this out of our 3-out, 2-in set. This play works well if you have a good, tall post player, and when the defense is fronting the low post.When the defense fronts our low post player as seen in diagram A below, it naturally makes it difficult for us to pass from the wing to the low post. A lob pass from the wing is not easy because usually there will be a helpside defender X5 in the paint. Instead of trying to force the lob pass from the wing, we run "High" and have the opposite post O5 cut to the ball-side elbow for the pass from O2. Doing so takes the helpside defender X5 up to guard O5. Meanwhile, O4 seals the low post defender outside and now O4 should have inside position for a lob pass from O5. This pass from O5 to O4 usually has to be a lob over the defender, and we want O4 to hold the inside target hand up high so we can make a good pass for the lay-up.
Notice also that after passing to O2, O1 screens-away for O3. This makes the pass to the high post easier by taking the X1 defender to the opposite side (sometimes X1 will drop into the high post area and deny that wing-to-high post pass). Also, this exchange between O1 and O3 helps keep the X3 and X1 defenders occupied and hopefully out of helpside in the paint. O1 goes to the weakside wing-corner area for a possible skip pass from O5, while O3 moves up to the top.
If the pass is skipped from the high post (O5) to the corner (O1) as seen in Diagram C, the low post player (O4) should continue to seal the low defender and then post-up on the ball-side low block for the possible pass from the corner.
We could run this play to either side. Run "High-2" to the right side (when the first pass goes to O2) and "High-3" to the left (starting with a pass to O3). In "High-3", everything is just the opposite. The first pass goes to O3 while O4 flashes to left elbow and we are looking to pass to O5 inside. O1 screens for O2 and moves to the right wing-corner area while O2 comes to the top.
"Loyola"
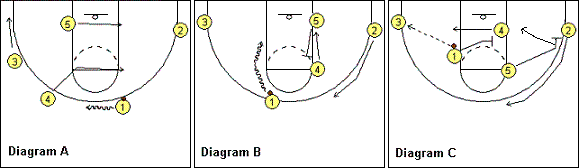
After taking the right seam (above) a couple times, now is a good time to run "Loyola". Loyola is similar, except run into the top left seam. Now the X1 defender is trying to deny that right seam, so we have O1 make a cross-over dribble and attack the left seam. O3 drops deep into the left corner, O4 and O5 move to the right side, and O2 will pop out on top as our safety. The key here is for O1 to be patient, and not attack until he/she sees that the post players are off the to right side and O3 is in the corner (diagram A).Notice in diagram C, that if O1 passes out to O3, O1 cross-screens for the opposite post player. We also have O5 back-screen for O4, and then O5 also back-screens for O2 (and then O5 rolls to the hoop). This maintains some movement away from the ball, and keeps those defenders occupied.
"Louisville"
This play gives O2 a chance to take the seam with a dribble-move from the top. We move both post players off to the left side, to clear the right side of the lane for O2. O4 flashes to the left elbow, while O5 posts up on the left low block area. O1 passes to O3. O2 back-screens for O1 and O1 moves out wide to the right corner. O2 pops out on top and gets the pass from O3. You'll notice that this now looks a lot like the Loyola play, except with O2 going into the right seam. O2 can shoot the lay-up or pull-up jumper, or pass to O5 or O1.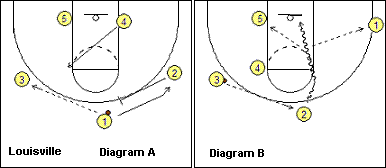
"Slip"
This play starts off as a simple screen-the-screener play with a "slip" option. This play is shown with the 3-out, 2-in set. You can also run the slip play with the 4-out, 1-in offense. "Slip" features two back-screens. Often the defense relaxes after defending the first screen and we get the cutter, or screener, open on the second back-screen.In diagram A, O1 passes to O3 and screens away for O2. O5 moves out to the ball-side corner. O2 cuts through. If open, O3 could pass to O2.
In diagram B, as O1 is setting the pick for O2, O4 comes up and sets a pick for O1. After O2 has cleared through, O2 continues through and sets a pick for O5, who is also an option. O2 then rolls off the screen for the three-point option in the corner. O1 cuts off O4's screen to the hoop, and gets the pass from O3 for the lay-up. If O4's defender switches to cover O1, then O1 should clear out to the right corner and now, if O4 sealed the screened defender correctly, he/she should have inside position for the roll cut through the lane and the pass from O3.
In diagram C, the defense "jump-switches" the screen (X4 moves out on top of the screen) with X4 jumping out on O1. Here, O4 seals and "slips" the screen with a back-cut and pass directly to O4.