
The now popular "dribble-drive motion offense" uses a 4-out set and very little screening. Rick Torbett's "read and react offense" works very well in a 4-out set. Below, we examine three different "looks" in our 4-out offense, depending on where we want our post player to locate... "4-Out", "4-High", and "4-Low".
You can also use the 4-out offense to post up any of your players inside, if you feel there is a defensive mismatch. For example, if a defensive player has four fouls, have your player that he is guarding set up as the inside post player. Then get the ball inside to him/her and attack the defender for the easy basket (since the defender is in foul trouble and will play "soft"), or force the fifth foul. You can change the inside player by just calling something like "4-Out to John", where John is now the inside player.
You can make the 4-out offense as complicated, or as simple, as you want. Youth teams should start out with just the basic 4-out motion offense, learning the motion rules and "how to play". You can add a few simple plays. High school and more advanced level teams that have more practice time, can expand and use the basic 4-out motion offense, and the "4-High" and "4-Low" sets. Each of these sets come with a number of set plays and options.
We typically do not use all of these plays in one season. We pick those plays that best suit our current team personnel. Next season, as our players change, we may use other plays and options (or if we are blessed with several good post players, may use the 3-out, 2-in motion offense instead, and only sparingly use the 4-out offense).
Use those plays that will best benefit your team. Importantly, don't overload your players and try to teach too much at once. Teach the basic motion and sets, and then add other plays and options gradually.
"4-Out"
This is a more simple, free-lance style of 4-out motion offense that uses the rules explained below under "General Rules". Refer to the diagram to see the basic set-up for this offense.
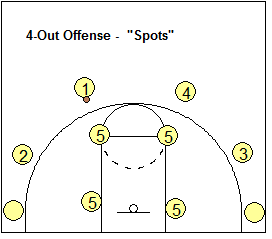
With "4-Out", our post player moves as the ball moves, using the low blocks, anywhere up and down the lanes, paint area, elbows and high post (free-throw line area)... basically anywhere he/she can get open for a pass inside.
When the ball is on top (O1 or O2), O5 should locate at high-post, ball-side elbow area. If the ball is passed to O5 at the high post, O3 and O4 should be thinking about a back-cut to the hoop if they are being denied the pass. O5 passes to the back-cutter for the easy lay-up.
When the ball is on the low wing, corner (O3 or O4), then O5 should move down to the ball-side low post.
General Rules
Perimeter players can fill any of the six spots shown in the diagram above, two top spots, two wing spots, and two corner spots. Outside players should be moving, screening for each other (on-ball screen and screen away). Additionally, hand-off screens work well.
For example, O1 dribbles toward O2, hands the ball off to O2 while screening O2's defender. O2 comes around the screen and either shoots the three-pointer, or makes a dribble move inside (see Weave-Screen Plays).
Dibble-penetration, attacking the seams, is often possible when the post player is located on the opposite (weakside) low block. If you have good three-point shooters, you can go "inside-out" where a guard dribble-penetrates a seam and then kicks the pass outside (usually to the corner) to a wide open perimeter player for the three-point shot. For this reason, we often like to locate our best shooter O2 in the right corner.
Pick and roll moves work. Give and go plays work (example: O2 passes to O4 and cuts to the hoop for the pass back from O4). If a dribble entry is made, the outside players rotate (example: O1 dribbles toward O2. O2 can either exchange with O1 and move to his/her spot, or O2 can rotate down to take O4’s spot and O4 cuts through to take O3’s spot, while O3 rotates out to the O1 spot).
Four things you can do after making a pass:
- Screen for the ball.
- Screen away.
- Cut to the basket (example: give and go, or back-cut). Backcut if the defender is denying the pass.
- V-cut and pop back outside for the return pass and outside shot.
Rules without the ball:
- If you have an under-play (defense sagging off), pop out to spread the defense.
- If you have an overplay (being denied), backcut.
- Someone dribbling at you, backcut (except for the weave plays).
- Fill the open spot when a teammate cuts inside.
- When someone dribble-penetrates, relocate.
- Screen away, and pop out.
- The most important rule is to keep moving.
Set Plays
You can run any of the set plays listed below under the 4-High and 4-Low sets... just make sure you start the post player in the correct spot.
"4-High" Motion Offense
Sometimes we want our post player to locate at the high post. This takes the defending post player away from the hoop and allows our post player to go 1-on-1 with defender from the free-throw line area. This also opens up the inside underneath for backcuts or dribble-penetration from the wings and corners.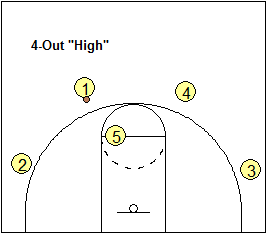
Our high post player can be used as a screener for our perimeter players. He/she may set two or three perimeter screens, and then, once a big-little mis-match occurs (by the defense switching the screens), will post up inside.
Additionally, certain plays run better off the 4-High set. 4-High may work well against teams that like to full-front our post player. Our post player moves up to the high post, and if still full-fronted, seals the defender, and cuts to the hoop for the over-the-top lob pass. Or our post player can seal the defender as the pass goes to the corner, and then cuts to the hoop for the pass from the corner.
4-High Set Plays
- "Topside" and "Counter"
- "Flash"
- "Slip"
- "Swing"
- "Fist"
- Weave-Screen Plays - "W2", W2-back", "W3", "W4"
Transition into 4-Out Offense
After a rebound, the wings O2 and O3 sprint wide up the court all the way to the corners. By going deep into the corners, we open the court with better spacing. For a wing entry pass, they can then cut up to the wing for the pass. The first "big" up the court sprints low in the paint or low block area. O1 speed-dribbles up the court and our rebounder (here O4) trails up the court to fill the opposite top spot.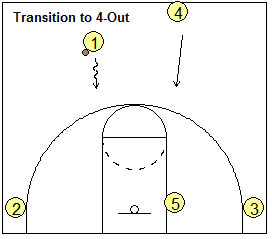
From here we have lots of options. If our point guard is good at attacking the defender, he/she might just try to make a dribble-move and attack the seam up the right lane line for a lay-up, or for a kick-out pass to our shooter O2 in the corner. We can also just start the offense here in the "4-Low" set. To start the "4-High" set, O5 simply flashes up to the high post. We could also start here with a quick hitter play.
"4-Low"
Sometimes we like our post player staying down low, moving from low block to low block, or from short-corner to short-corner. The 4-Low set opens up the top and the lane for 1-on-1 dribble-penetration and cuts from the top. We also use this set to run our "Big" series of plays, where we post-up our "big" 1-on-1 with the defender.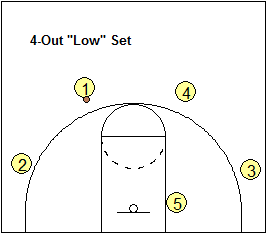
The short-corner to short-corner strategy is used if the defense has a big, strong inside post defender, or shot blocker, that we feel our post player cannot consistently beat in a 1-on-1 post-up situation. So if our post player can hit a couple shots from the short-corner, hopefully this will draw their big defender outside away from the hoop. Taking the shot-blocker away from the hoop then allows our smaller, quicker post player to beat the defender with a shot-fake and dribble move.
4-Low Set Plays- "Big Series" - Big, Big-15, Big-Left, Big-Down, Big-43, Big-Double
- "Loyola" and Loyola-2
- "53"
- "34"
- "13" and "24"
- "Black"
- "52-Curl"
- "14"
- Weave-Screen Plays - "W2", W2-back", "W3", "W4"
4-Out motion offense and our low post player is double-teamed...
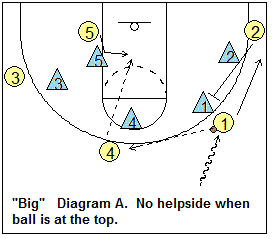
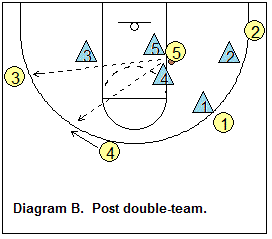
Teams that play good man-to-man defense, will double-team our low post player, making it tough to score inside. Usually the double-team (help defender) comes from the opposite wing when we feed the low post from the wing or corner (diagram B below). There are a couple things you can do.- Feed the low post from the top ("hi-lo" plays like the "Big" series), because the helpside defense is not established when the ball is at the top of the key (diagram A below).
- After feeding the low post from the wing or corner, your post player gets double-teamed by help coming from the opposite wing (diagram B).
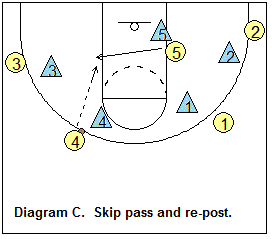
Teach your post player to immediately skip pass out to the opposite wing (where the help defender came from), and then follow the pass and immediately re-post on the opposite side, for the quick pass back inside (from O4 in diagram C). Oftentimes, the new helpside defender (X2) will be late in rotating over to double-team, and O5 has a better chance to score 1-on-1 vs the X5 defender.
"4-Out Quick Hitters"
In addition to the plays listed above, here are more good quick hitting actions that you can run right from the initial transition."45" - Hi-Lo Option
Here's a good option when you have strong inside post player. This action is simple but effective and continuous. The rules are simple - (1) whenever O4 receives the pass on the perimeter, we look for the quick hi-lo pass into O5 posting up, and (2) if the hi-lo is not open, O4 passes to a perimeter player, follows and runs a screen and pop.Diagram A shows O1 coming up the right side in transition. O4 fills to the top, middle and gets the pass from O1. O5 immediately posts-up and O4 passes to O5 for the inside post-move. O1 down-screens for O2 and they exchange (to occupy their defenders, keeping them out of the paint so they can't help on O5).
Not shown in the diagrams, after running this a couple times, the X4 defender might hard pressure O4 to help prevent the hi-lo pass. O4 could give a pass-fake, and dribble-drive around X4 up the right side of the lane for the lay-up (with pass options to O5 and O1).
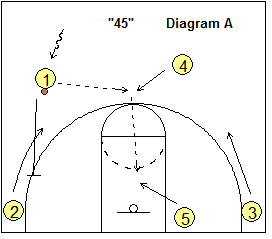
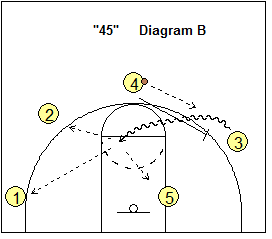
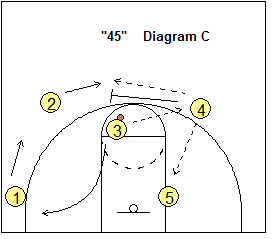
Diagram B shows that the hi-lo was not open. O4 passes to O3, follows the pass and ball-screens for O3. After screening, O4 pops outside. O3 can attack for a lay-up, but also has a possible dump pass to O5, and kick-out pass options to O2 and O1.
In diagram C, O3's dribble was stopped. O3 might pass back to O4. Following our rules, O4 looks for the quick hi-lo pass into O5. If not open, O4 passes to O2, follows the pass and ball-screens for O2, and O2 and O4 run the pick and pop.
Wing Entry, Ball-Screen
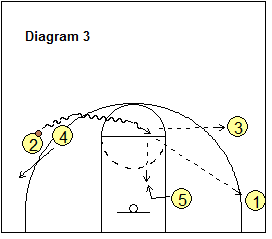
O2 cuts up to the wing and gets the entry pass from O1 (diagram 1). O1 can cut through to either corner. O4 then ball-screens for O2. O2 might not use the ball-screen and here drives hard to the baseline (diagram 2). Diagram 3 shows O2 using the ball-screen and the "pick and pop" option with O4 popping out to the arc after the screen. Notice O2's kick-out pass options to O3 or O1. As O2 turns the corner of the ball-screen, O5 posts up hard inside and could get the quick pass from O2.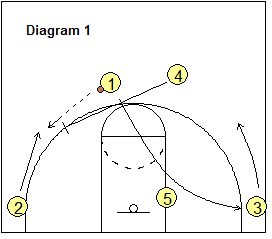
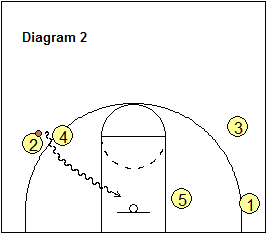
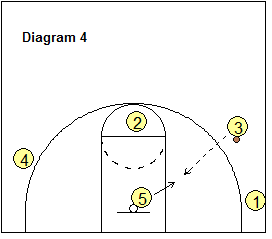
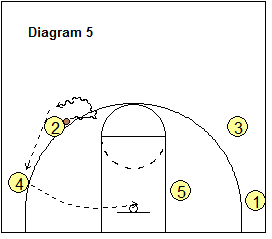
If the kick-out pass goes to either O3 or O1, either could shoot the open 3-point shot, or pass inside to O5 posting up (diagram 4). Diagram 5 shows O2's dribble-penetration being stopped or trapped by the defense. Here O2 reverses and passes to O4 in the corner for an open shot, or perhaps a shot-fake and dribble-drive. O5 cleans up the back-side rebound.
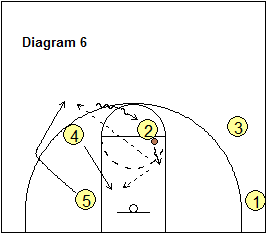
If O4 is not a good outside shooter, we will use the "pick and roll" option instead (diagram 6). After the ball-screen, O4 cuts to the hoop and O5 cuts out and replaces O4 on the arc. This allows for spacing for the pass to the O4 on the roll cut. If O2 passes back out to O5, O5 looks to either shoot or make the hi-lo pass inside to O4 posting up.
The defense may deny the pass to the wing. But we can still get the ball to the wing by using either a dribble hand-off or (2) a shallow cut. Diagram 7 shows that O1 dribbles to the wing and hands-off (weave-screen) to O2. O1 clears to the corner. From here we can run the pick and roll or pick and pop options with O4 screening for O2.
Diagram 8 again shows O1 dribbling to the wing, and here O2 makes a shallow cut inside and then back outside. O1 now passes back to O2 (diagram 9) and the ball-screen options with O4 are again in play. This diagram also shows another simple option... instead of passing to O2, O1 might pass to O5 posting up.
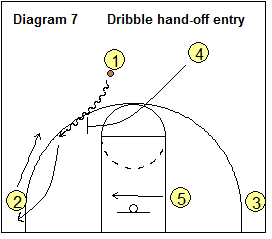
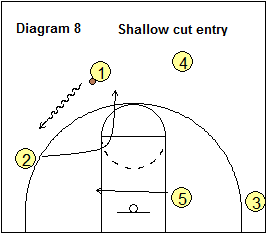
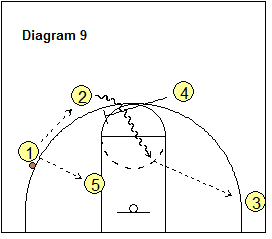
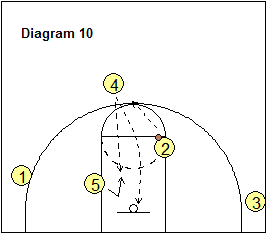
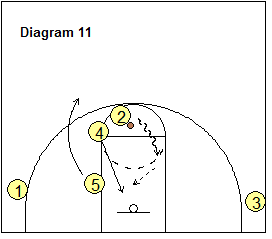
Diagram 10 shows that O2 has dribble-penetrated around the O4 ball-screen ("pick and pop"), but gets stopped inside. O2 passes back to O4 on top. O4 can either shoot the open shot, or look for the hi-lo pass inside to O5 posting up. Diagram 11 shows O2 and O4 running the pick and roll option as O5 replaces O4 on top. If the pass goes back to O5, he also has the same options or shooting or passing hi-lo to O4 posting up.
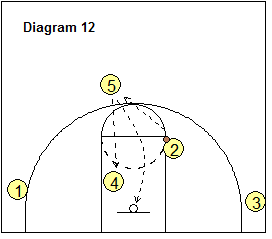
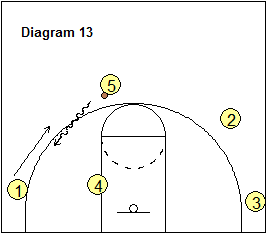
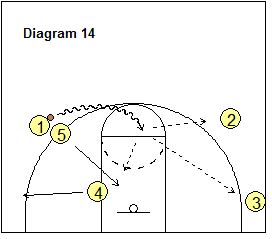
If neither the shot nor the hi-lo pass are good options, O5 dribbles to O1 for a dribble hand-off (diagram 13). O1 and O5 can run either a pick and pop or a pick and roll (diagram 14).
Wing Entry - Left
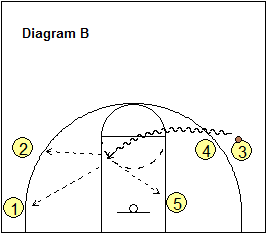
Similar to the wing entry above, but this time we'll run it to the left side. This time, O1 passes to O4 and cuts through to the right corner, and O5 re-locates to the right low block. Meanwhile, O4 passes to O3 and follows the pass and ball-screens for O3. Now we have O3 and O4 running the pick and roll on the left side (diagram B). Notice the good spacing with O1, O2 and O5 all on the opposite side. Now O3 has the options of scoring, passing to O4 rolling inside, or to O5 on the opposite block, or to O2 or a 3-point shot.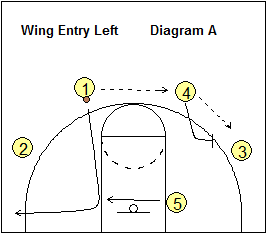
"High" - High Post Option
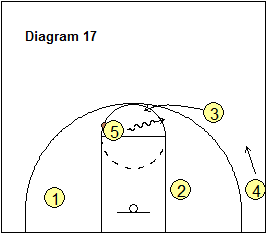
If the defense is really denying the wing entry hard, this high post option is a good pressure release. Here O5 flashes to the high post and gets the initial pass from O1. O2 starts a cut up toward the wing (as if looking for the wing pass) to engage the denying defender, and then quickly cuts back-door for the pass from O5. On the weakside, O4 down-screens for O3 and they exchange spots. If the pass to O2 is not open, O1 cuts around O5 for a hand-off and dribble-drives for a lay-up (diagram 16). If that option is not open, O5 dribbles toward O3 for a dribble hand-off (weave-screen - diagram 17). O5 will run a screen and roll option.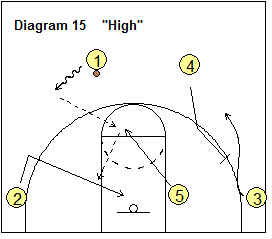
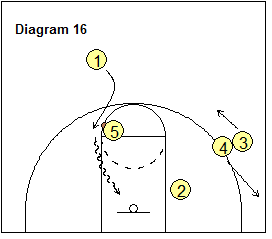
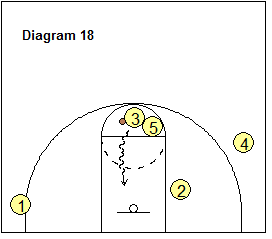
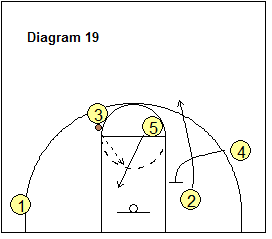
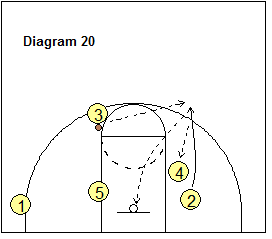
O3 takes the hand-off and dribble-drives to the hoop (diagram 18). Diagram 19 shows that O3 is stopped on the dribble-penetration and looks for O5 on the roll cut inside. Meanwhile, O4 down-screens for O2, and O2 cuts hard to the top and could get the pass from O3 for the open outside shot (diagram 20). O2 could also pass inside to O4 posting up.
"2" - Baseline "Runner" Option
Use this option if you have a really good shooting guard who can get open using inside, baseline screens. To set this up, we will abandon the 4-out set and have O4 move inside to the low block opposite O5 (diagram 21). O3 will move up and we now have a two-guard front. O2 will work along the baseline, using screens from O5 and O4, cutting out to either side. O1 and O3 look to pass to O2 open on the outside for a 3-point shot. The defense might get all caught up on stopping O2 and forget O4 and O5. After O2 runs off a screen, the screener (either O4 or O5) should "shape-up" to the ball for a quick hi-lo pass from the top.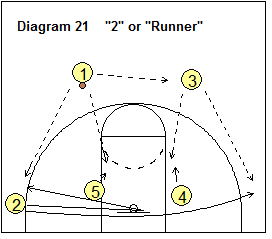
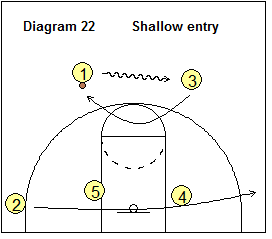
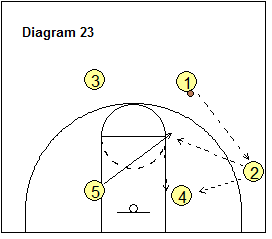
If the defense is denying the top pass from O1 to O3 and vice-versa, we counter that with a dribble over and shallow cut (diagram 22). Diagram 23 shows additional options on the pass to O2. Here O2 could also pass to O4 posting up, or to O5 who has flashed to the ballside elbow. If O4 is being fronted by the defender, he/she seals the defender and should be open for a quick pass from O5.
"Duke"
Here's another good play that gives our shooter O2 and open 3-point shot. The play starts with a weave screen with O1 doing a dribble hand-off with O2 (diagram A). O2 dribbles high toward the point and passes to O4. It's very important for good spacing that O2 dribble high to the top, even with the lane line. O5 screens for O1 (diagram B), and O1 cuts around the screen, across the lane, looking for a quick pass from O4 and a lay-up. If not open, O1 moves out to the corner as O3 rotates up to the wing.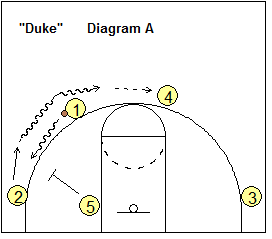
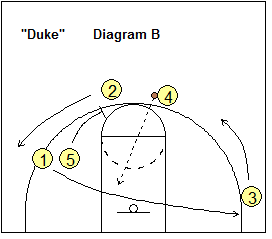
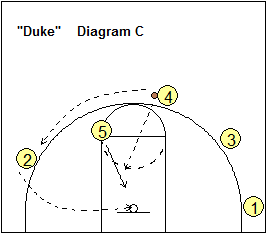
After screening for O1, O5 moves up and flare-screens for O2. It's very important that O5 set this screen very high along the lane line extended, else there will not be adequate spacing for O2 on the wing. O2 cuts over the flare-screen to the wing-corner area. O4 skip-passes "over the top" to O2 (diagram C). After back-screening for O2, O5 rolls to the ball-side low post. O2 has the option of shooting the three-pointer, or passing inside to O5 in the low post. If the pass to O2 is denied, then O5 can post up inside and O4 can make the "hi-lo" pass to O5.
Another option is the "slip" (diagram C). After O2 hits a couple of "3's", the defense may switch the O5-on-O2 flare-screen. If the defense switches, O5 slips the screen, and cuts hard through the lane to the hoop, for the pass from O4.
Curl and Flare Option
Diagram 24 shows, right out of transition, O4 down-screening for O3 (who has stepped in toward the short corner). O3 curls around O4 for a pass from O1 and a shot. If this is not open, O5 screens for O3 and O3 uses the flare-screen and cuts to the right wing and could get the pass from O1 there. Meanwhile, O4 screens for O2 cutting along the baseline to the opposite side. O1 could pass to either O3 or O1. To make the pass to O2, O1 might have to take a few dribbles to the left.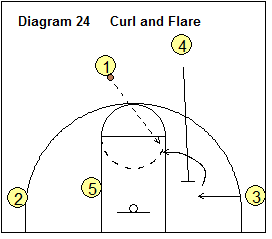
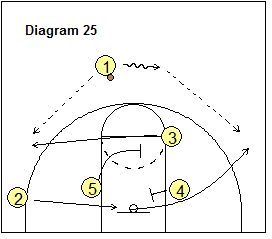
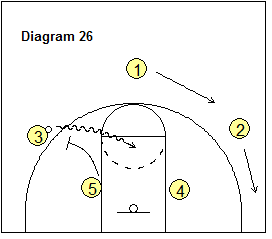
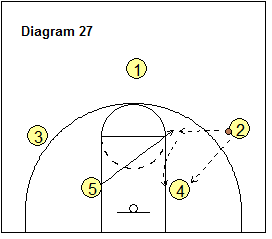
Diagram 26 shows the pass has gone to O3. If the pass from O3 to O5 is not immediately open, O5 runs a ball-screen option with O3. Diagram 27 shows that the pass went to O2. O2 could shoot or pass to either O4 posting up, or O5 who has cut to the elbow. The hi-lo option from O5 to O4 is again something we look for.
Flex Option
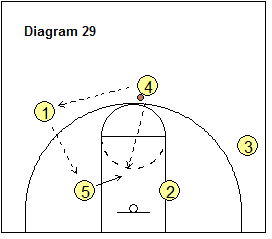
Diagram 28. O1 dribbles right and passes to O4 on the top. O5 flex-screens for O2 and O2 cuts around the flex-screen looking for the pass from O4. The next option after O2 is a pass from O4 to O5 posting up after the flex-screen. If this is not open, O4 passes to O1, and O1 looks to pass to O5 posting up (diagram 29). After passing to O1, O4 down-screens for O2 (diagram 30). O2 cuts hard to the top for the pass from O1 and the open shot.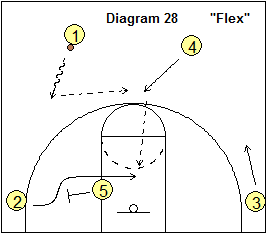
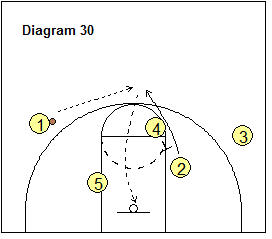
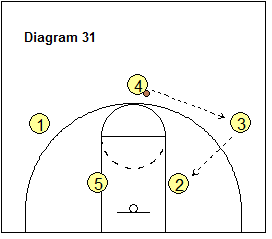
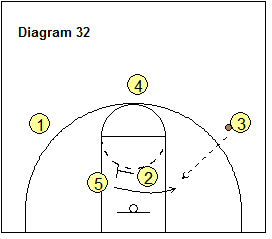
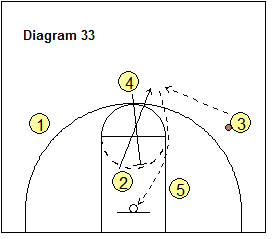
Let's back up. After the initial pass from O1 (diagram 28), O4 might pass instead to O3 (diagram 31). O3 could pass to O2 posting up. If O2 is not a good post option, O2 cross-screens for O5. O5 cuts to the block for the post pass from O3. Meanwhile, O4 down-screens for O2 (diagram 33). O2 cuts hard to the top for the pass from O3 and the shot.
Back-Screen Lob Option
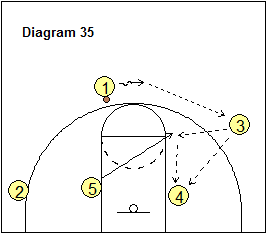
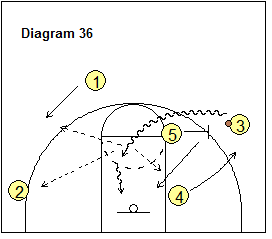
If our trailer is an athletic player, we might try this play. Off transition, O3 back-screens for the trailer (here O4 - diagram 34). O4 cuts to the hoop for a lob pass from O1 for a lay-up or dunk. Very importantly, for O4 to be open (no inside helpside defense), O5 must post up hard and engage his defender. If the lob is not open, O1 passes to O3 (diagram 35). O3 can pass to either O4 posting up, or to O5 who has flashed to the ballside elbow. O5 could pass hi-lo to O4. If neither O4 or O5 are open for a pass, O5 steps out and runs a pick and roll option with O3 (diagram 36). O4 replaces out to the arc for spacing. Kick-out options to O1 and O2 are also available.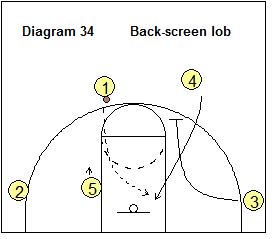
More Reading on the 4-Out Motion Offense
Andrew Grantz:


