
Next season, as our players change, we may use other plays and options. Use those that will best benefit your team. Don't overload your players and try to teach too many of these at once. Also see the 4-Out Low plays.
The following plays are used in conjunction with the 4-Out "High" set, i.e. with our post player playing at the high-post (free-throw line area). In teaching our 4-Out system, we first teach the basic offense, and then add a few of these plays as the season progresses. Here are several set plays that you can run out of the 4-Out "High" offense:
"Topside" and "Counter"
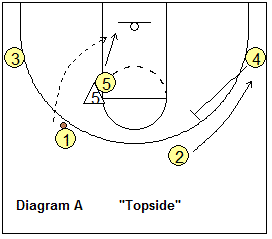
These two plays may work well against teams that like to full-front our post player. Both of these plays could actually be run out of the basic 4-out motion offense, without being called a specific name. They could be taught in the context of simply learning how to read the defense."Topside" is a very simple play, but oftentimes simple plays work the best, if the executed correctly. Our post player O5 moves up to the high post, and if full-fronted, seals the defender, and cuts to the hoop for the over-the-top lob pass and lay-up (diagram A). Notice that O4 back-screens for O2, mainly to occupy the weak-side, helpside defenders.
"Counter"
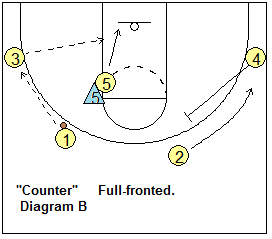
In diagram B, notice that O5 is being full-fronted in the high post. Instead of the lob pass, we pass into the corner as O5 seals the defender and then cuts to the hoop and receives the pass from the corner for the lay-up.
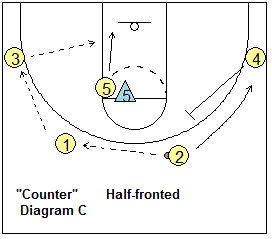
If the perimeter passes are being denied, you could have O3 back-screen for O1. O1 then flares to the corner for the skip-pass from O2. Again, notice that O4 back-screens for O2, mainly to occupy the weak-side, helpside defenders.
"Flash"
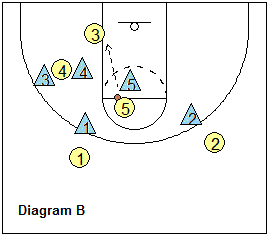
Start with in the 4-out, 1-in offense with O5 low on the opposite low block. O5 makes a flash cut to the free throw line and receives the pass from O1. Meanwhile, as O5 is receiving the pass, O4 fakes out and then makes a hard quick back-cut to the hoop. O5 passes to O4 for the lay-up (diagram A). If O4 is covered and doesn't get the pass from O5, he/she continues through and sets a back-screen for O3. O3 cuts around the screen and gets the pass from O5 for the lay-up (diagram B).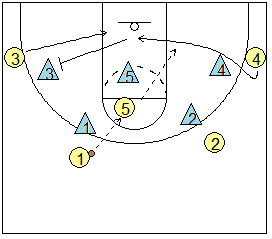
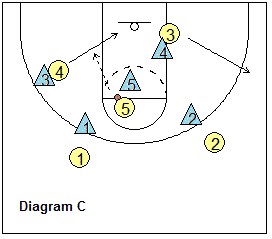
If the defense switches on the screen, O4 should have inside position (after sealing the defender). O3 clears to the opposite side and O4 rolls to the hoop for the pass from O5 (Diagram C). Of course O5 could take the shot from the free throw line, or make a dribble-drive to the hoop as additional options.
"Slip"
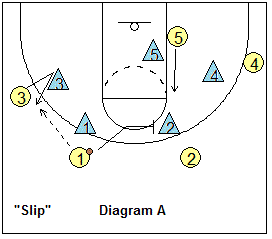
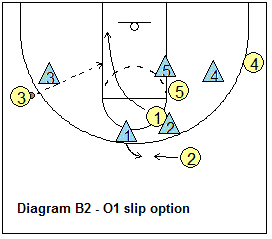
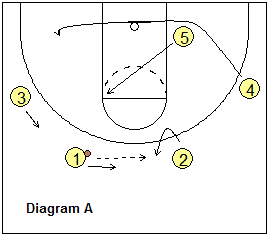
Set up in the 4-out, 1-in offense. See Diagram A. O1 has the ball and the post player O5 moves up to the weak-side elbow, in our 4-High set. This starts out as a simple pass and screen-away play. Technically, it is a "screen-the-screener" play, with a "slip" option. O1 passes to O3. O1 sets a screen for O2. O2 cuts hard around the screen, looking for the pass from O3 and the lay-up (Diagram B).Diagram B2 shows the first slip option. Here we see that the X1 defender jump-switched the screen, impeding O2's cut. O1 reads this switch, seals the screened X2 defender and slips the screen, cutting to the hoop for the pass and lay-up.
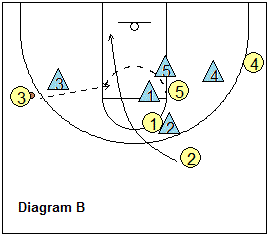
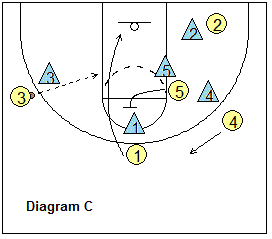
Let's back up... assuming O2 has cut through (as in diagram B), and does not receive the ball, then he/she continues out to the weak-side short corner. Now, O5 back-screens for O1 who cuts around the screen for the pass from O3 and the lay-up (diagram C). O4 moves out to the top as a defensive safety (Diagram D).
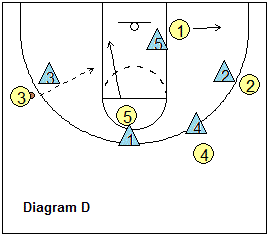
If the defense switches the O5 on O1 back-screen and O1 does not receive the pass (diagram D), then O5 should have inside position on the X1 defender if he/she "sealed" the defender correctly. O5 slips to the hoop for the pass from O3 and the shot.
"Swing"
Set up in the 4-out, 1-in set. O5 flashes to the ball-side elbow, into the "4-High" set (diagram A). O4 "swings" around to the ball-side low block. You will notice that this "clears out" the right side (diagrams A and B).O2 makes a V-cut and receives the pass from O1. O1 then cuts around O2, and receives a hand-off from O2 and takes it hard to the hoop for the lay-up. If the defense prevents the hand-off, then O2 might be able to make either a bounce pass, or a "dump" pass (a soft lob pass) to O1, who still takes it to the hoop (diagram B).
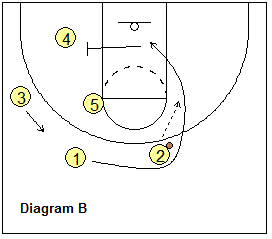
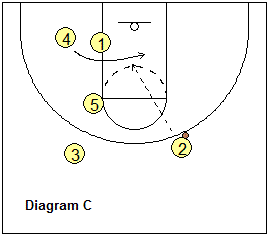
If O1 does not receive the ball, then he/she cuts through and screens for O4. O2 passes to O4 for the lay-up (diagram C).
Another excellent option (if you have a good O2 guard) is to let O2 have the option of attacking his/her defender 1-on-1 after O1 has cleared through, as there might be an open lane to the hoop. If O4 sees this happening, he/she should stay clear and remain on the opposite, weak-side block.
"Fist"
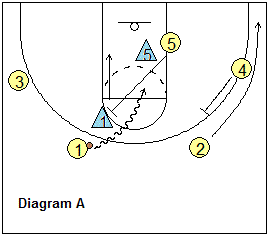
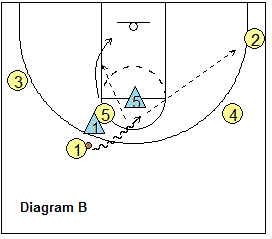
Here’s a simple but effective pick-and-roll play to run out of the 4-out, 1-in motion offense set. I remember watching John Stockton and Karl Malone of the Utah Jazz, the masters of the pick-and-roll. If the pick and roll is executed properly, it is very difficult to defend.O5 moves up into the high-post set, and acts as a screener. O5 can screen for any of the perimeter players, running a two-man, pick-and-roll game. I think this is more effective if the post player sets the pick on the middle side so the ball-handler (O1) can go around the pick and up the middle of the lane, while O5 rolls to the opposite side of the lane (diagram A). If the defense switches (diagram B), O5 should be open on the seal and roll to the hoop. We also have O4 back-screen for O2, who goes to the corner. This not only occupies the helpside defenders, but also allows for more spacing for O1, and also gives us the option of the kick-out pass to O2 in the corner for the 3-pointer.
One last pointer...
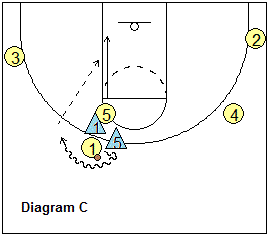
If the X5 defender comes out on top of the screen to prevent O1's penetration (diagram C), O1 should immediately recognize this and spin around back to the left. O5 still has inside position on X1 and releases to the hoop. Now O1 can hit O5 with the over-the-top lob pass.
"Weave-Screen Plays"
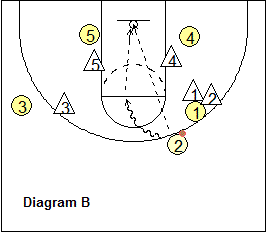
The weave screen (or "W") plays are simple hand-off plays that can free up a perimeter player for either an outside shot, or a dibble-drive to the hoop. The diagrams below show a 3-out, 2-in set, but these plays can also be run with the 4-Out and 5-Out sets. Below we see "W2", where O1 dribbles at O2 (diagram A), hands the ball off to O2 and screens the X2 defender. O2 comes around the screen for a 3-point shot, or a dribble-drive to the lane (diagram B).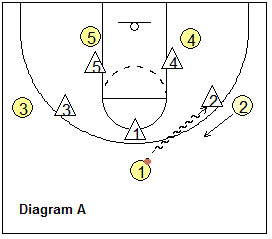
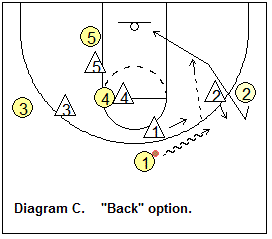
After running this a couple times, the X2 defender will often cheat out over O1 and try to stop the hand-off... here we run the "back" counter option, where O2 reads this and simply back-cuts for the pass from O1 and the lay-up.
"W3" would be the same play, but run at O3... O1 dribbles at O3, and O3 gets the hand-off and shot. "W4" would be the same play as "34".
"Pitt"
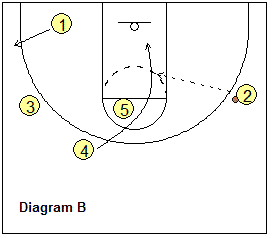
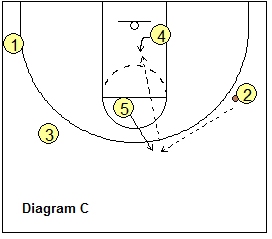
This play gives us several options. Diagram A shows a 4-out set with our post player O5 high at the free-throw line. O1 passes to O2. If O1 makes a good hard basket cut, he/she could get the return give-and-go pass from O2 for a lay-up. If the pass to O1 is not there, O1 cuts out to the opposite corner. Now O4 makes a UCLA cut off O5's screen at the high post and could get the pass from O2 and the lay-up. After screening O5 pops out to the top and gets the pass from O2. O4 posts up inside for a hi-lo pass from O3 (like the "Big Series")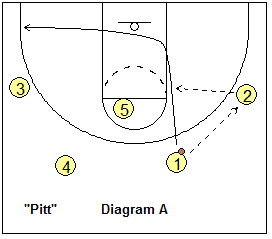
Also see: 50 Series


