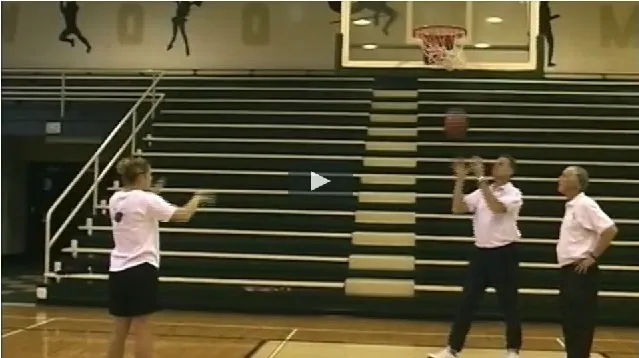
Basketball Shooting Fundamentals, Form and Technique - Teaching/Learning How to Shoot
By Dr. James Gels, From the Coach’s Clipboard Basketball Playbook"Helping coaches coach better..."
Basketball shooting is the most important skill a player can have. Years ago we used to think that some kids were just "born-shooters" - either you had the knack or you didn't. Having natural ability does make it easier, but nowadays, I believe most players can become good shooters with proper instruction on the fundamentals of shooting, combined with drills and practice.
The principles, technique and form discussed below should be used as guidelines, not absolutes, and may be helpful in correcting or teaching a player who is struggling with his/her shooting, or is just learning to shoot. Coaches should resist the urge to change a player's shot if it works for that player. We can all think of great shooters who didn't have perfect form. So, "if it ain't broke, don't fix it!"
Disclosure: This page contains affiliate links, which means that Coach's Clipboard receives a small commission (at no cost to you) if you make a purchase using these links.

Have your feet about shoulder width apart with your knees bent a little as your thigh muscles will provide power for your shot. If you shoot right-handed, your right foot should be slightly forward, and your weight should be on the balls of your feet (not the heels).
Many coaches believe that the shoulders and body should be square to the hoop, although some great shooters are more comfortable with the side that the ball is on turned a little toward the hoop (find out which is most comfortable for you).
Shooting instructor Tom Nordland teaches an "open-stance" with the body and ball turned sideways toward the basket. I think players have to find what works best for them, and then work hard to make the shot repeatable. An important thing here is that when you jump to shoot, keep balanced, not falling or drifting sideways or backwards. Stay balanced.
Holding the ball
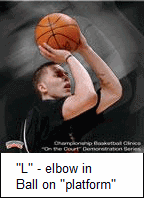
Use both hands to hold the ball, but only your shooting hand will actually propel the ball forward. Don't shoot two-handed. Your shooting hand is the "platform" and should be underneath the ball with your wrist cocked back. Your elbow should be bent at about 90%, like a backwards "L", and underneath the ball (not out to the side).
Your other hand (the "guide hand") helps support or balance the ball, but does not enter into the actual shooting of the ball. Your non-shooting hand should actually come off the ball just before you release it, so that you are shooting with one hand. Use your fingertips, not palms, to hold and release the ball.
Here's a little trick to learn what the correct "platform" is. Extend your shooting arm straight forward with your palm facing up and let the ball sit comfortably on your hand (fingers comfortably apart). Now in one motion, bend the elbow while rotating the forearm, wrist and hand under the ball so that the ball is now resting on your hand above your right shoulder with the wrist cocked back.
The shoulder is the "hinge", the elbow points toward the hoop and an "L" is formed by the forearm and the arm (looking from the side). Your elbow should be in and pointing at the basket.
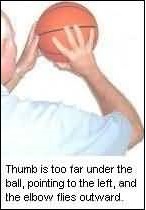
The position of the shooting hand's thumb is important. The shooting thumb should be pointing upward at about a 45 degree angle left (right-handed shooter). This will cause the elbow to naturally fall under the ball. I have seen players with the thumb too far under the ball and pointing straight leftward, which causes the elbow to fly outward (see the photo). So if your shooter's release looks a little goofy, has side-spin, or the elbow is flying, look at the position of the thumb - a very simple thing that's easy to fix.
Shooting instructor Tom Nordland teaches the open stance and believes that we should forget about the elbow, that the important thing is the position of the hand, which is best aligned with the ball and the basket, with the shooter using an open stance. He believes that the elbow will naturally be out 4-6 inches.
Set PointThe set point is where you position the ball just prior to releasing the shot. If you are right-handed and shoot with your shoulders and feet square to the hoop, have the ball to the right of your face, a little toward the right shoulder. Don't line the ball up in the center of your face, as this may result in your shooting elbow flying away from your body, and could actually cause your wrist to turn sideways (supinate) when you release the ball, imparting a side-spin.
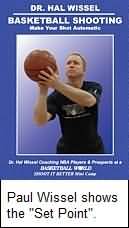
On the other hand, if you are more comfortable shooting with your body turned in toward the shooting side (Nordland method), then the set point can be more in front of your face. You will have to find which method works best for you.
Also, it is best that the ball is as high as your forehead, or even higher (if you are strong enough or close to the basket), in order to keep your shot from being blocked. But do not cock the ball back over the top of (or behind) your head as this causes a "slinging" motion and a flatter shot.
Finally, younger players who have less strength will need a lower set point, perhaps even below the shoulder, in order to get more power. As the youngster matures, the set point should move higher.Upward Force
Most of the power in your shot should come from the upward force of your jump (in the jump shot), or the upward force from your thighs moving upward (in the free throw). You should not try to power up longer shots with your arm, wrist or hand muscles. Let the big muscles in the legs do the work. Release your shot on the upward force of the jump, not on the way down.
Aiming the ball
Pick out a spot to aim at - either the back of the rim, or just over the front of the rim, or the backboard (if you are shooting a bank shot). Concentrate on this spot, and don't look at the ball, or the flight of the ball.
Releasing (shooting) the ball
Use the shoulder as a "hinge". Your shooting arm extends forward toward the hoop (keep the elbow in), the elbow extends (straightens), and then you release the ball with a snap of the wrist, with the ball rolling off your fingertips.
This imparts backspin ("rotation") that all good shooters have. Backspin makes the ball land softly on the rim, and often creates a favorable "shooter's" bounce, resulting in a score even though the shot was not perfect.
Shoot the ball high with an arc. An arched shot has a better chance of going in, since the hoop is actually bigger, wider for a ball coming in from above, than from a line drive.
Don't "push" the ball with the heel of your palm; let it come off your finger-tips. Make sure that you extend (straighten) your elbow - don't "short-arm" the shot. Practice so that your release becomes repeatable.
Follow Through
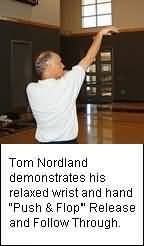
This is important in getting the proper rotation (back spin) on the ball. Your fingers should be pointing toward the hoop, and your wrist bent forward, in a "goose neck" fashion. Many coaches like to see the index finger pointing at the hoop. Another analogy is if you were "reaching into the cookie jar" high on the shelf.
Shooting instructor Tom Nordland prefers the term "Push and Flop" instead of "gooseneck", emphasizing that the follow-thru is not a forceful snap of the wrist and hand downward, but a simple relaxed motion and position, in which the hand may actually "bounce" without any tension. Hold the release after your shot until the ball hits the rim.
You will notice that with a proper follow-through, the palm of your hand will be facing downward toward the floor. If it is turned sideways with the back of the hand facing outward (as if you were going to shake hands with someone), then you are incorrectly twisting your wrist during the release. Keep your eye on the target - don't watch the flight of the ball.
Form Shooting
This is an excellent drill for developing correct shooting form. Start with shots directly in front of the basket, just a few feet away, to develop correct technique. Shooting further away does not allow the shooter to focus on this repeatable form. Do this drill for just 5 minutes every day. Even experienced good shooters who are going through a "shooting slump" find this drill helpful in restoring their shooting mechanics and confidence.
Move farther away as you get better, but do not sacrifice correct technique. Practice shooting from locations where you will likely shoot from in a game.
Related pages:
- Taking Good Shots - Shot Selection
- Hal Wissel's Shooting Tips
- The Jump Shot
- How to Become a Good Free-Throw Shooter
- Guard Breakdown Shooting Drills
- 2-Man Shooting Drills
- Team Shooting Drills
