From the Coach's Clipboard Basketball Playbook
Disclosure: This page contains affiliate links, which means that Coach's Clipboard receives a small commission (at no cost to you) if you make a purchase using these links.
The jump shot is the most common shot used today. It revolutionized the game back in the late 50's and 60's. Most games used to be very low scoring until the arrival of the jump shot. With the jump shot you don't have to be stationary and open (like with a set shot). You can score on the move, and in traffic, by jumping and extending your shot over the defender.
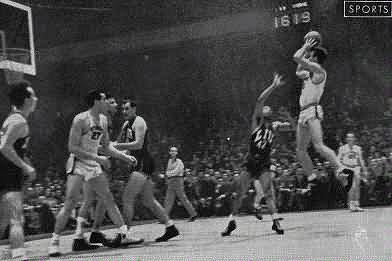
Kenny Sailors (Wyoming) is credited by many as being the first with the modern jump-shot. In a game in Madison Square Garden in 1942 (see photo below), he stopped, squared up, jumped, and shot the one-handed shot while suspended in the air with all the fundamentals used in today's jump-shot... and fans would say in amazement, "what was that?!"
Be sure that you don't start shooting a jump shot until you are physically strong enough. If you start too young, you will sacrifice good technique.
Gripping the Ball, Footwork
Receive the ball in the "triple threat" position, where you are ready to either shoot, pass, or drive. Young kids have difficulty shooting the jump shot because they are not strong enough yet. They will often use a two handed method. But you must develop the correct technique to be effective.First start with shots only one foot from the basket... form-shooting.
Gradually extend your range outward. If you get too far out, your technique will fall apart and you will develop bad habits. If your shot is suffering, try to fix it by going back to the basic one foot shot near the basic, using proper release, backspin ("rotation") etc.
Gripping the ball and the shooting motion are the same as in the set shot. The shooting hand acts as a "platform" and is under the ball. The other hand is used to balance the ball and should be on the side of the ball. Receive the ball with your knees bent and feet shoulder width apart.
Use your legs to provide the power for your shot. Be sure that you are squared up to the basket, with your shoulders squared up to the hoop. Alternatively, some good shooters prefer to turn the shooting side in toward the hoop with that foot forward. Whichever method you find most comfortable, make sure that you are in balance before releasing the shot.

JJ Redick
Spring off the floor with both feet and do not drift sideways or backwards. Go straight up, or slightly forward for longer shots, and shoot the ball just before you reach the height of your jump, especially on outside shots, where you need the extra power of the upward force from the jump.
On short shots in the paint, shoot from the top of your jump. This will allow you to shoot over a defensive player. When going up for the shot, the shooting arm forms an "L" with the elbow pointing toward the hoop, and the forearm vertical, with the ball up over your head.
Release
Focus on your shooting spot, either the back of the rim, just over the front, or a section of the backboard. Concentrate on this area and don't watch the flight of the ball. When shooting, the shoulder acts as a "hinge" as you extend your arm upward.Fully extend (straighten) the elbow while keeping the elbow in. Failing to extend the elbow results in "short-arming" the shot. Release the ball with a snap or the wrist, letting it roll off your fingertips. Then extend your fingers and wrist in a "gooseneck" fashion, or like you were "reaching into the cookie jar" high in the cupboard (see diagram).

Developing a Quick Release
See Shooting with a Quick Release by Coach Hal Wissel.Related pages:
Want More Coaching Content?
Get access to more complete articles, diagrams, and coaching tools with Premium Membership.
View Membership Options