From the Coach's Clipboard Basketball Playbook
Disclosure: This page contains affiliate links, which means that Coach's Clipboard receives a small commission (at no cost to you) if you make a purchase using these links.

First see Man-to-Man Pressure Defense (Part 1) - force sideline, on-ball, deny, helpside, help and recover, dribble-penetration.
Also see Man-to-Man Pressure Defense (Part 2) - post defense, cutters, special situations.
You must have a plan for defending screens. Of utmost importance is communication between defenders and calling out the screens before they are actually set. Coaches differ on the best way to defend screens. No matter how you do it, you must have a plan, practice it, and make sure all players understand.
Inside post - post screens should be switched, since you usually do not end up with a size-quickness mis-match (see below). On outside perimeter screens, you must decide whether you want to switch these screens, try to fight over them, or slide through (under) them. Switching on the outside could occasionally lead to size and quickness mis-match, especially if a post player steps outside to set a screen for a guard.
On this page:
- On-ball screens (Pick and Roll)
- Outside Perimeter Lateral Screens
- Inside Post Screens
- Down-screens
- Back-screens
On-ball screens (Pick and Roll).
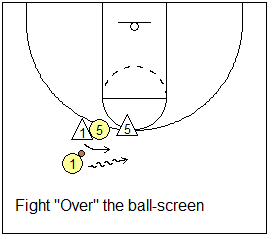
See this page, "Defending the Pick and Roll", for numerous ways to defend this situation. I believe you must pick one method that you think works best for your team, and get really good at it.Coaches differ on how to defend ball-screens. Here are a few ways to do it... "over", "under", and "ice" techniques.
"Over" (no switch)... with "over", the screened defender aggressively fights over the screen by getting into the ball-handler while also stepping his/her inside leg over the screener. This method avoids switching and "big-little" mismatches. The disadvantage is that if the screened defender does not get over the screen, the ball-handler gets loose to shoot or drive. This possibility can be mitigated by having the X5 defender "show" over the screen to contain the ball until X1 can recover. When X5 shows over the screen, this forces the ball-handler away from the hoop and allows X1 to get over the screen more easily. X5 then quickly recovers to O5 with high hands to deny the pass.
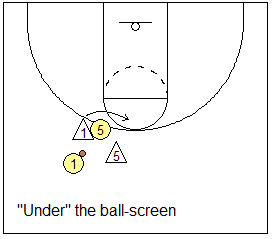
"Under" (with a switch)... here the screened defender X1 goes under the screener. The disadvantage is giving up the open outside shot by the ball-handler. To avoid this and to pressure the ball, we "jump-switch" with X5 sprinting above the screen to pressure and contain the ball. So a switch occurs with X1 on O5 and X5 on O1, possibly resulting in size and quickness mismatches. We have also used this jump-switch technique for defending hand-off screens (weave screens).
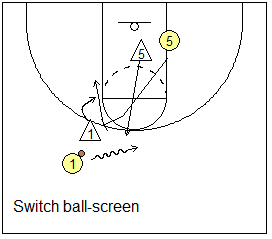
Coach Andrew Grantz switches all pick and rolls and aggressively attacks the ball. As X1 feels contact from the screener, he/she quickly spins around the screener in order to get position to deny a pass to the screener (see the video below). Meanwhile, X5 aggressively sprints above the screen to the ball and "goes for the ball"... trying to deflect or steal it. This usually results in the ball-handler having to take a couple dribbles back away from the hoop, and hence prevents both the outside shot and the dribble-drive.

"Ice"... as with all pick and roll plays, communication is key. The post defender X5 yells out the screen and "ice". The ball defender X1 immediately steps up to deny O1's middle dribble-penetration, forcing to the sideline. X5 sprints up, squares up the ball-handler and with X1 contains the ball-handler, or forces to the sideline, never allowing the middle. At this point, X5 should not feel responsible for O5 and in fact does not leave O1 until either (1) O1 picks up his/her dribble, or (2) X1 calls X5 off.
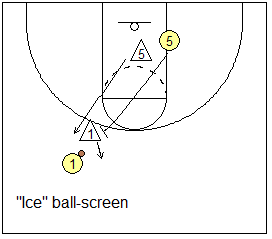
Then X5 recovers by sprinting to O5 with high hands to stop the pass from O1. X5 could get help from X4, X2 and X3 as seen in the diagram.

Outside Perimeter Lateral Screens
It is easy to switch these screens and usually a mis-match does not occur. The interesting thing is that since our wing defender (X3) is in helpside, there really in no-one to screen (diagram H). It becomes more of an exchange. When O3 moves out to the top, we switch, and have X1 take O3. Notice (diagram I) that our X3 defender in helpside, doesn't even need to move on the switch, since the ball is on the opposite wing and she/he just says in the paint in helpside.


If our weakside wing X3, for some reason, is not in helpside and gets screened (diagram J), we switch this screen. The screened defender X3 drops a step or two back just before the screen arrives ("steps under") and avoids getting sealed outside by the screener... a "step under and switch".
Inside Post Screens
As stated above, it is best to switch inside screens. Here you are usually not giving up a size or quickness advantage, and switching gives us the best chance to deny the pass into the low post.When defending inside, lateral post screens, the screened defender always "steps under" (takes a giant step back toward the baseline) - diagram K.


If the cutter goes low (baseline side), the screened defender gets an arm bar up and stays with her/his man (no switch)... "step under and stay" (diagram K2). The key is... the defender getting screened must step back toward the baseline before the screen actually arrives.
If the cutter goes high (over the screen), then the defenders switch... "step under and switch" (diagrams L and L2). Again, the screened defender always steps-under (toward the baseline) just before the screen arrives.
The danger with any inside lateral post screen is for our screened defender to get pinned inside. This should not happen if the screened defender "steps under" the screen. After stepping-under, she/he can easily get into the ½ fronting position from the baseline side.


Again the rules for defending lateral inside post screens are:
- The screened defender always steps under before the screen arrives.
- "Low cut" (the cutter goes low) = step-under and stay.
- "High cut" (the cutter goes high) = step-under and switch.
- We also "step under and switch" when defending inside post screens on baseline out-of-bounds plays.
Down-screens
We defend down-screens by following in the cutter's footsteps, as we chase around the down-screen, and do not switch. This is similar to how we defend the curl cut, where we chase the cutter and do not switch.See the two diagrams below. Why not just switch the down-screen? - as the X2 defender is in perfect position to pick up the cutter O4 coming around the screen, and X4 is in good position to take the screener O2. Two problems could arise. First, after the switch, you could have a big-little mismatch. Second (see the diagram to the right below), the cutter may read this switch and instead flare out to the short corner for the pass and open shot, as X2 is caught inside. So we believe it is better not to switch this screen and instead aggressively chase around the down-screen.


On the other hand, here are coach Fran Fraschilla's thoughts on down-screens. He wants to avoid size mis-matches. You can switch "equals" - i.e. guard-on-guard screens, and post-on-post screens can be switched. A post-guard screen that creates a mis-match, is not switched. The screened defender's teammate "opens up" and allows the screened defender to slide through, so there is no switch.
Back-screens
We switch back-screens. See the diagrams below. As O2 cuts backdoor, X4 will yell out the screen and switch, and prevent the pass inside to O2. Very importantly, the screened defender X2 must quickly step in front and around to get inside position on the screener O4, and avoid getting pinned outside. This is usually not too difficult if X4 calls out the back-screen to warn X2 that it is coming.After this switch, you may have a big-little mis-match and these defenders will switch back at the first opportunity... which may be during the next perimeter pass, especially if the pass goes weakside.


A back-screen could also happen on the perimeter - e.g. a wing-to-point back-screen, or "flare-screen", (as in our "Kentucky" plays). Again, we switch this. X1 takes the screener O2. X2 is in helpside and can stay there, unless the ball is skip passed to O1 after the back-screen.

Related pages:
Want More Coaching Content?
Get access to more complete articles, diagrams, and coaching tools with Premium Membership.
View Membership Options